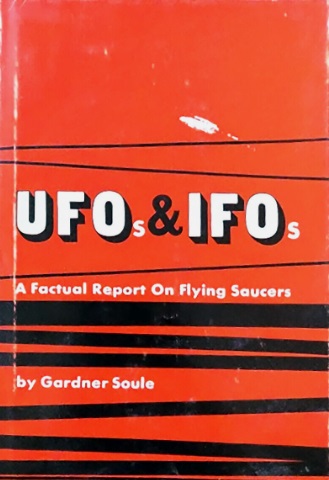
Category Archives: Science fair ideas

1921 Homemade Phonograph

1921OctPS2

A hundred years ago, the cost of a phonograph was becoming reasonable so that most Americans could afford one. But for the frugal handyman, there was another option, as shown here in the October 1921 issue of Popular Science.

Not only could the home craftsman make his own phonograph and save some money, but the homemade version would be superior to most commercial phonographs. The majority of the machines were hand-crank phonographs, but this one was electric, relying on a motor powered either by batteries or household current.

TypewriterEraserThe platter was made of a piece of brass, with another strip of brass soldered to the edge. This was driven by the motor using a friction drive made of a typewriter eraser
like the one shown here. Surprisingly, you can still buy a manual typewriter, but this style of typewriter eraser is no longer made. Like everything, however, you can find them on eBay.

The magazine explains how to construct the pickup and tone arm, which consists of a brass tube and the lid from a jelly jar. The board at the rear not only supports the tone arm, but serves as a sounding board, presumably providing room-filling audio.

One issue that is not addressed by the article is how to regulate the speed, since the motor will need to be spinning at about the right number of revolutions per minute. The relative size of the eraser and platter will, of course, provide some gearing, and there would be some room for experimentation. And with a DC motor, the voltage could be used to get the speed right. But the motor is going to have to start out at approximately the right speed, so some experimentation would be necessary for which motor to use.

As long as the craftsman got the bugs worked out, the result would be a quality phonograph, albeit not as aesthetically pleasing as the one normally found in the parlor. Students looking for an interesting science fair project can follow the instructions provided by Mr. Wizard in the video below.  All you need is a pencil, a pin, a piece of construction paper, some tape, and, of course, a record that you don’t mind suffering possible damage.


Some links on this site are affiliate links, meaning this site earns a small commission if you make a purchase after clicking the link.

1921 Signaling Device

1921OctPSA hundred years ago this month, the October 1921 issue of Popular Science showed this signaling device for use by the military. It provided a level of security, because its light beam was visible only over a small area. It’s a very simple idea–it consists of a telescope with a flashlight bulb mounted inside at the focal point. It was easily aimed by looking through the telescope. The bulb’s filament was visible, and it was simply a matter of lining it up so that was visible over the spot where you wanted your signal seen.

Students looking for a science fair project could easily recreate this.  All that’s needed is a toy telescope like the one shown here.  It can be carefully disassembled and the bulb place inside.  You can use the bulb from an old flashlight, or buy the bulb separately.  For this project an old-fashioned incandescent bulb will work better than an LED.

You’ll also need some hookup wire and batteries.  While not absolutely necessary, a battery holder will make the job a lot easier.  Normally, for a science project involving light bulbs, it’s most convenient to get a socket for the bulb.  However, in this case, the socket might not fit.  Therefore, the best option would be to solder the wires directly to the bulb.  A soldering iron, complete with solder and everything else you need, is surprisingly inexpensive.

To send Morse code, you’ll also need a small pushbutton switch.


Some links on this site are affiliate links, meaning this site earns a small commission if you make a purchase after clicking the link.

1941 Electro-Mechanical Oscillator

GeneralRadioExperimenterThis site often features science fair projects, and we often specialize in impressive projects that can be whipped together in one evening. This project doesn’t come in that category, but the advanced student who is willing to do some tinkering can replicate this tuning fork oscillator from the October 1941 issue of General Radio Experimenter.

Shown above is a tuning-fork oscillator utilizing a vacuum tube and a tuning fork. It is used to produce a very precise audio tone using an electro-mechanical process. The vacuum tube serves as the oscillator (and a modern recreation could just as easily use a transistor), and a mechanical tuning fork serves to determine the frequency. A simplified schematic diagram is shown below. The tuning fork needs to be ferrous in order for it to work.

WWV 1927 frequency standard. Wikipedia image.

WWV 1927 frequency standard. Wikipedia image.

A similar circuit was used for the frequency standard for WWV in 1927, as shown at the left.  Advanced students wishing to duplicate this project will find some guidance at this site and this site.  Students looking for the more familiar last-minute but impressive projects can browse our science fair category for ideas.

GeneralRadioExperimenter2


Science Fair Idea: Airfoils

1941SepPS1If Junior likes playing with matches, and the due date for the science fair project is rapidly approaching, then the perfect project can be found in the September 1941 issue of Popular Science. This experiment answers the question, “which surface provides the least wind resistance,” and it turns out the answer is the airfoil.

Junior can easily demonstrate this with the self-explanatory experiment shown here. With the piece of cardboard flat, drag is produced, and when you blow toward the flame, it actually moves back toward you. But when the card is bent into a teardrop shape, scientifically known as an airfoil, then the air blows the flame away.

1941SepPS2


Science Fair Idea: Clothing to Keep You Cool

1941AugPSsciencefairIf Junior just remembered that the science fair project is due tomorrow, and it hasn’t even been started, you’ve come to the right place. This last-minute experiment from 80 years ago will prove an important scientific principle, you have everything you need around the house, and the teacher will be suitably impressed at Junior’s ingenuity. The teacher needn’t suspect that the project was put off until the last minute.

This project answers the simple question, “what kind of clothing keeps you cooler?” It turns out that it’s light colored clothing. All you need is a couple of pieces of cardboard, a table lamp, and a little bit of wax. If you can’t find any wax around the house, you can always go to the closest all-night supermarket and buy a package of birthday candles.

While you are out buying the wax, Junior should cut out the two small human figures, one from a piece of white cardboard, and one from a piece of black cardboard. If you can’t find any black cardboard, just make the both out of white cardboard and color one with a black magic marker. The arms should be made separately, and the arm is attached with a small drop of wax. If Junior is not old enough to play with matches, then an adult should light the candle and place a drop of wax in the correct spot.

Then, you stand up both of the figures and shine a lamp on them. You want the hottest lamp you can find, so don’t mess around with energy-efficient bulbs.

Eventually, one of the figures will get hot enough that its arm will fall off. Unless the laws of physics have changed in the last 80 years (hint: they haven’t), it will be the one in dark clothing. Junior has proven that you will be cooler if you wear light clothing on a hot day.

The experiment appeared in the August 1941 issue of Popular Science.


Science Fair Ideas: Center of Mass & Sound Waves

1936AugPSIf Junior just announced that the science fair project is due tomorrow, but the project hasn’t even been started, there’s no need to panic. Thanks to these simple projects from 85 years ago, it’s still possible to get an A on the assignment, and the teacher will assume that many weeks of planning went into the project.

Shown above is a simple method of determining the center of gravity (or, since the teacher will prefer the more scientifically accurate term, the center of mass) of an object. Cardboard is used, but any similar substance of uniform thickness will work fine. After the pattern is cut out, the design is hung by one edge. A plum line (which is just a piece of string, with a weight on one end) is hung from the same point, and it is traced on the item. Then, it’s hung from another edge. Where the two lines intersect, that is the center of mass.

The other project, shown below, gives a visual indication of sound waves. All that’s needed is a couple of cardboard tubes, a balloon, and some sand. Both projects appeared in the August 1936 issue of Popular Science.

1936AugP2S


1941 Optical Communicator

1941AugPS1Eighty years ago, this well dressed gentleman was sending a message through this light beam transmitter, as described in the August 1941 issue of Popular Science.

The magazine was a bit prophetic, since there was more experimentation with the idea after Pearl Harbor. When hams were ordered off the air for the duration of the war, optical communications was one of the ways they continued to practice their hobby (along with carrier current communications.)

The idea is simplicity itself, and it’s an idea that I independently invented as a youngster 30 years later, and I know others did as well. The light beam of a flashlight is modulated with an audio signal by wiring the light in series with the secondary of a transformer. The primary of the transformer is wired with a buzzer and key to send Morse code. When I did the same thing, I hooked the transformer primary to the output of a transistor radio or other audio amplifier, allowing voice signals to be sent.

The receiver is an audio amplifier, with a photoelectric tube hooked to the input. In my later experiments, I used a solar cell hooked directly to the input of an amplifier, which didn’t seem to mind the small DC voltage.

The student looking for an interesting project for a science fair could easily duplicate this experiment with modern equipment, at very low cost.  It’s an easy demonstration of a communications device dependent only upon light.

1941AugPSRx1941AugPSTx


1911 Homemade Alarm Clock

1911JunePopElec110 years ago, a young John Long of Leechburg, PA, sent in this self-explanatory idea for building an alarm clock to the “Young Edisons” department of Popular Electricity magazine.

The magazine carried the feature of letters from readers of its Junior Department. Letters were to accurately and briefly describe experiences in the making and operation of electrical devices and the performance of electrical experiments. The magazine asked readers, “see how good an ‘engineering report’ you can make of your investigations.”

Young Mr. Long constructed this alarm switch with a battery, door bell, and pocket watch.

Some links on this site are affiliate links, meaning this site earns a small commission if you make a purchase after clicking on the link.

Human Reflex Science Fair Project

1941JunePSIf Junior is looking for an interesting demonstration for the first post-COVID science fair, he or she can’t go wrong with this illustration of how human reflexes work.  If you touch a hot stove, your body needs to react before the brain kicks in.  Therefore, you are hardwired to jerk your hand away.

This demonstration illustrates the principle.  A flame is brought close to a simulated human hand, but as soon as it comes into contact with the simulated nerve, the solenoid energizes and jerks the hand away.

The idea appeared 80 years ago this month in the June 1941 issue of Popular Science.  For the young scientist wishing to duplicate the project, all of the parts are readily available on Amazon:  This switch will kick in at 40 degrees Celsius, an uncomfortably warm, but not dangerous temperature.  This 3-volt solenoid will reliably move the hand.  And there’s no need for the old-school dry cell batteries shown above.  Alkaline D cells will work very well, especially if you have a battery holder for them.   And while Junior can make the hand out of cardboard, he or she will be virtually guaranteed the blue ribbon with a realistic looking plastic hand.

Some links on this site are affiliate links, meaning this site earns a small commission if you make a purchase after clicking on the link.

Homemade Cardiac Monitor: 1961

1961JunePEIf Junior is looking for a spectacular science project in the field of biomedical engineering, this one is a sure winner.

Sixty years ago, the June 1961 issue of Popular Electronics showed how to construct this simple cardiac monitor. The circuit was simple, amounting to a 4 transistor audio amplifier. The diagram called for 2N279 transistors, which are apparently unobtainium today, but this substitution guide lists the 2N2431 as equivalent, and it is available at a reasonable price.

The input comes from two electrodes, one of which is placed on each arm. In this position, they will pick up the currents from the heart, which are alternating currents of up to 100 kHz. The audio portions will be audible in the headphones, and also displayed on the meter. The magazine notes that you are not hearing the actual sound of the heart, merely the amplified voltage sent to the heart muscle. Other muscles can be monitored by placing the electrodes on either side of the muscle in question.

The electrodes are simply pieces of metal placed on the body. Prior to placing them, the skin needs to be scrubbed to improve the conductivity. This is done by scrubbing with Lava soap
or Ajax cleanser. (However, since Ajax is now billed as “non-scratching”, I’m not sure it would still work.) The article notes that the device is completely safe, even for children. First of all, it runs off only three volts. And the connection to the electrodes goes through a capacitor, so even that voltage has no pathway to the body.

More advanced versions are available today, but the advanced student will almost certainly bring home the blue ribbon in the science fair by building the medical device at home.

1961JunePE2