Category Archives: Science fair ideas

Science Fair Idea: Magnetostriction

1939FebPSStudents looking for an interesting science fair project to illustrate a concept that the science teacher has probably never heard of can’t go wrong with this simple experiment demonstrating the principle of magnetostriction.  This property causes certain materials to change shape and dimensions during the process of magnetization. The effect was first noted by James Prescott Joule in 1842.

The effect is quite small, but the ingenious experiment shown here will detect the change in length of the iron rod. One end is placed on a roller, which might be as simple as a wooden dowel. The dowel has a rather long pointer affixed to detect the small changes in length.

The magnetic field is induced by winding insulated wire around the rod.  It’s powered by two old-school dry cell batteries, but two modern alkaline D cells will work just as well or better.  The construction of the experiment will be neater if you use a battery holder.

Chances are, the science teacher has never heard of magnetostriction, and he or she will be quite impressed that you were able to induce a measurable change of length in the seemingly solid iron rod.

The project appeared in Popular Science 80 years ago this month, February 1939.


1943 Life Magazine Electric Motor Project

1943Dec27LifeThis classic science fair project appeared 75 years ago today, in all places, in the December 17 1943 issue of Life magazine.

The magazine carried an article extolling the virtues of the nation’s then 200 million electric motors. It concluded with these plans for making one at home with only a wooden block, 5 paper clips, 13 thumbtacks, and a spool of enameled wire.

The old fashioned dry cell battery is a nice touch, but an alkaline D cell will work just as well.  For those who wish to bypass the parts procurement process, here is an available kit:


American Basic Scientific Club

1958NovBL This ad for the American Basic Scientific Club appeared inside the back cover of Boys’ Life 60 years ago this month, November 1958.  For only $3.45 each, the club would send one scientific kit per month for eight months, each containing an interesting project on subject such as radio, meteorology, atomic energy, and photography.  At the end of eight months, the student would have a working regenerative receiver, signal tracer, code practice oscillator, darkroom (including enlarger), and many other scientific instruments.

I don’t recall hearing about this club, which was apparently in decline by the 1970s when I would have been interested.  There’s an interesting history of the club at this website, written by the son of the founder.  And a picture of the three-tube regenerative receiver, along with a partial schematic, can be found at this link.  The set appears to be mounted on a chassis made of a single piece of metal, mounted on the cardboard box in which the kit arrived.  It does have a power transformer, making it relatively safe for the young experimenter.

One of the books included with the kits was a guide to obtaining a ham radio license.  It appears that the receiver could be built for either the AM broadcast band or 80 meters, meaning that it probably made a workable receiver for a new novice.


1948 Homemade Transistor

1948OctRadioNewsShown here is a crude but functional homemade transistor from 1948, from the October 1948 issue of Radio News.  While the author had not yet used the fragile device in a working circuit, he did note that he achieved amplification by a factor of up to 50.  The transistor was very unstable at that high amplification, but it did work reliably amplifying by a factor of 15.

The transistor was made of a 1N34 germanium diode carefully broken open.  One lead was kept intact, and the other two contacts were made by making cat whiskers out of filaments of old tubes.

The article cites some 1920s articles where the authors made “amplifying crystals” by a similar means.  By applying the techniques in this article, the advanced student could prepare a science fair project that his or her teacher would probably declare impossible–making a homemade transistor.


Science Fair Idea: Trajectory of Moving Object

1943OctPS2If Junior needs to quickly put together a science fair project, this idea from the October 1943 issue of Popular Science will demonstrate some meaningful science with minimal preparation.  It makes use of two marbles and an old hacksaw blade, although with a bit of ingenuity, substitutions can be made to take advantage of available materials.

The two marbles are placed at the edge of a table and whacked as shown in the illustration.  Obviously, one of them flies off the table much faster and further than the other one.  But by listening to the sound of them hitting the floor simultaneously, it is clear that they are traveling downward at an identical rate.

If the teacher requires a question to be answered by the experiment, it can be something along the lines of:  “Does horizontal velocity of a projectile affect the rate of descent due to gravity?”

Junior will walk away with the blue ribbon, and the teacher will be none the wiser that he waited until the last minute.


Distilling Water

1928OctRadioNewsIf you need some distilled water, it’s usually a pretty easy matter to go to the local supermarket and buy a convenient gallon jug. Or, if you’re willing to pay for the convenience, you can even order it on Amazon.

But it’s also easy to whip up a small batch at home, as shown in this self-explanatory photo from Radio News, October 1928.  The hanging container is filled with cold water, preferably ice water.  It should be as thin as possible.  The spout of the kettle is directed at this container, and the distilled water drips onto a plate below.

The idea was sent in to the magazine by  one C.A. Oldroyd.

If the aspiring young scientist needs distilled water for a science fair project, adding this method to the project will almost guarantee the elusive blue ribbon.


1948 Periscope

1948OctBLFor anyone desiring to see around corners, the periscope is the ideal solution to the problem. 70 years ago this month, the October 1948 issue of Boys’ Life showed how to make this simple but effective model.

In addition to a small wood block, only two parts were necessary.  And if you can’t find them locally, you can order them on Amazon:  Two two-inch mirrors and an 18 inch, 2 inch diameter mailing tube.  For making the precise 45 degree cuts, a miter saw was recommended.  Rounding out the bill of materials was some glue, and black shoe polish to paint the interior angles to reduce glare.

For older scouts, the completed periscope could be a useful tool for any number of purposes.  And for younger students, the project could serve as the basis for an interesting science fair project.

And for the more impatient modern youth, another option is to simply buy the genuine plastic periscope shown here.


Wood Burning USB Charger

We recently featured a 1958 Soviet kerosene powered radio and lamented the fact that similar products are not available today.  It turns out, however, that we were wrong.

Lufo
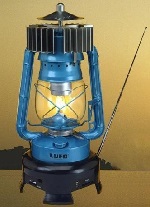
First, a Facebook comment to our original post alerted us to the Lufo lamp, shown here.  This is a kerosene lantern, apparently developed as part of a UN project to provide radio receivers for Africa.  The heat from the lamp operates a Peltier effect device which powers the built-in AM FM radio.

These don’t appear to be manufactured currently, but they are reportedly available in Europe if you look hard enough.

There is, however, one device on the market currently, and it doesn’t even require kerosene!  At Amazon, you can purchase a wood-powered USB charger that uses the same principle. You can then charge your phone using sticks gathered from your yard.

The USB charger appears to be a bit of an afterthought, but also appears to be fully functional. It appears that the Peltier device power supply is intended mostly to power an internal fan that increases the efficiency of the stove. But it also provides usable power, which is available from the USB socket.

The stove also includes an internal 2600 mAh lithium-ion battery to store the charge. According to the Amazon reviews, the stove itself works extremely well.  According to one review, the stove will boil a pint of water in about four minutes, which is quite good for a stove burning nothing but small twigs.   The stove is useful for charging a phone or other device. The fan speed appears to be a trade-off. With the fan on high speed, the stove runs most efficiently, but it also uses most of the current that is produced. It appears that the best compromise for generating electricity is to run the fan on low speed.

For the do it yourselfer, it seems that producing a similar device should be relatively easy and inexpensive.  The Peltier elements are readily available on Amazon.  You can also order direct from China with free shipping at this link.  They’re normally intended for use in applications such as 12-volt coolers, where an electric current is run through the device, where it produces a difference in temperature between the hot side of the device and the cold side.  But this is a case where the physics works the same with a minus sign in front of the equation:  If you generate a difference in temperature, this will cause electric current to flow.

You’ll probably need more than one, and you’ll probably have to experiment with wiring them in series (to increase voltage) and parallel (to increase current) to get sufficient power.  You’ll also need some kind of heat sink mounted on the cold side.  The device will have maximum output when the temperature difference between the two sides is greatest.  So you need to get one side as hot as possible while keeping the other side of the thin device as cool as possible.

Once you have sufficient voltage and current, you can hook the output to a 12 volt USB charger.  Even if you don’t have a full 12 volts, most such chargers are little more than a voltage regulator, so as long as your output is more than 5 volts, you should have a fully functional USB power connection.

To use your new power supply to listen to the radio, you could add the small portable shown here.  When batteries are available, you can use standard AAA batteries.  During the day, you can run it with the built-in solar cell.  And at night, you can plug it in to your wood burning charger with its USB port.

Of course, most of our readers will want to listen to shortwave, and will probably opt for this inexpensive USB-powered receiver  which tunes AM, FM, and 4.75-21.85 MHz shortwave.

In addition to being useful for camping or emergencies, such a project would be excellent for a science fair project.
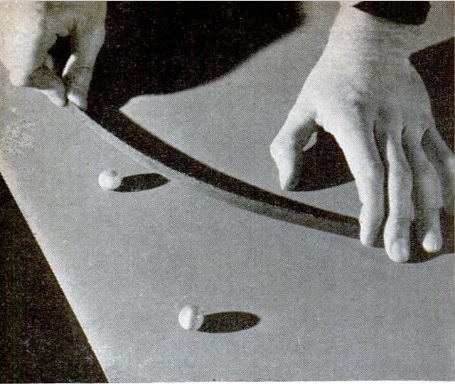
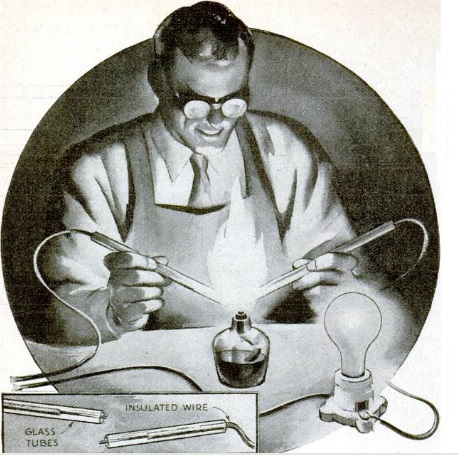
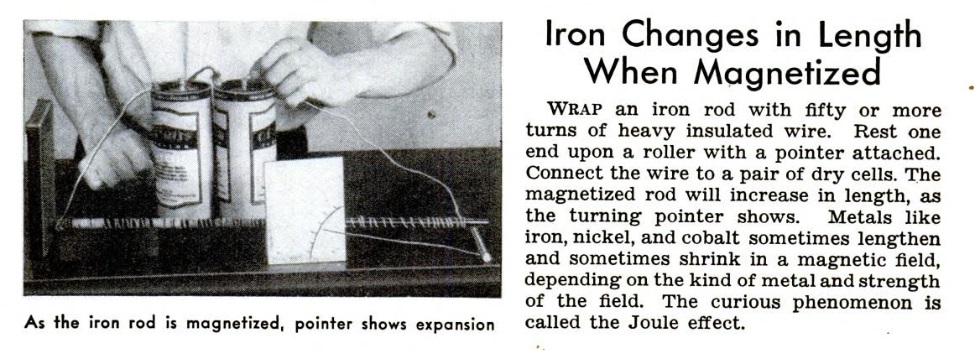


Science Fair Project: Electricity Through Glass

1938SepPSIf you’re looking for an interesting but slightly dangerous experiment for your science fair project, you’ve come to the right place, with this project from the August 1938 issue of Popular Science. With just a few odds and ends from the hardware store, you’ll be able to cause an electric current to flow through glass.

You’ll need some copper wire (which can be cannibalized from the electric light you’ll be using, as well as some glass tubes.  If you can’t find the glass tubing locally (or “borrow” a couple from your science teacher), then one of the least expensive options appears to be these reusable glass drinking straws from Amazon or these glass test tubes.

You’ll need a lamp cord similar to the one shown here, or you can simply use a normal desk lamp.  Cut one of the two wires leading to the lamp (or plug it into an extension cord and cut one of those two wires), and strip the insulation off the end of the two wires.  Insert each wire into a glass tube.

Of course, glass is an insulator, so the lamp won’t work when plugged in.  But when you hold the two glass tubes next to each other and heat them in a bunsen burner, electricity will begin arcing through the molten glass, and the light will come on.

It appears that what’s happening is that an oxide of the copper is mixing with the molten glass, and the current is using this as an electrical path.  When you remove the glass from the flame, the light will stay lit until the glass again solidifies.

Warning:  This experiment uses household electricity, which can kill you if you’re not careful.  Don’t work in a wet area or anyplace where you can touch a metal object.  Whatever you do, don’t let anyone touch either of the two exposed wires.  When you’re done with the experiment, cut the plug off your modified cord so that some younger kid won’t plug it in and get electrocuted.  Do this experiment only with adult supervision.


1978 Solar Oven

1978AugBLForty years ago this month, the August 1978 issue of Boys’ Life carried these plans for a solar oven. According to the magazine, the oven would reach 200 degrees, “hot enough to cook a meat loaf or bake breads in several hours.” The inner and outer boxes were insulated with fiberglass insulation and sealed air tight. The inside of the inner box was painted black with a “non-lead” paint. Four shiny aluminum panels could be used to direct heat into the oven.

A suggested improvement to increase efficiency was to use a double layer of glass with an air gap between the two panes.

If you would prefer to have someone else do the construction work, the solar oven shown at left is you can find  this solar oven Amazon which appears to have good reviews.