Category Archives: Food Storage

1943 Root Cellars

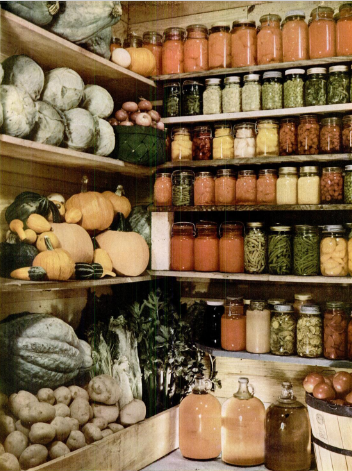
Screenshot 2023-11-28 9.15.20 AMScreenshot 2023-11-28 9.17.36 AMEighty years ago, many Americans were enjoying plentiful meals without worrying about rationing points, thanks to their victory gardens. And the December 6, 1943, issue of Life magazine offered some pointers about how to store the bounty of those gardens for the winter. Above is an image of a well-appointed root cellar. The magazine noted that a well-ventilated corner of the cellar, where the temperature remained between 35 and 50 degrees was ideal. And some of those fruits and vegetables are put up in some of the four billion Mason jars that were currently in use in the country.

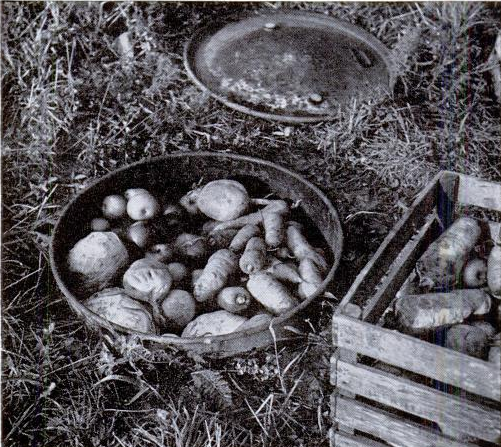
For those without a cellar, the magazine offered some ideas such as the one shown at the left for storage of root vegetables. In this one, a barrel is buried in the yard. After filling, it’s covered with straw, and then soil. On nice days during the winter, it is opened, and food for the next two or three weeks is removed.


Product Review: Great Value Pulled Pork in BBQ Sauce

PulledPork3CarSurvivalKit

Bottom Line:  Relatively expensive, but good way to add some variety to your survival kit.

We’ve previously reported about the importance of a car winter survival kit, to make sure you have enough food in the car to keep yourself reasonably comfortable if stranded. Recently, for example, a winter storm stranded motorists on Interstate 95 in Virginia for over 24 hours. As we showed previously, the kit in our car contains mostly dry food, and we have water and a means of cooking in the car.

One item that was lacking from the original kit was meat, or any type of protein for that matter. I corrected that after Christmas by buying a Hickory Farms meat and cheese gift package at a steep after-Christmas closeout discount, similar to the one shown at right.

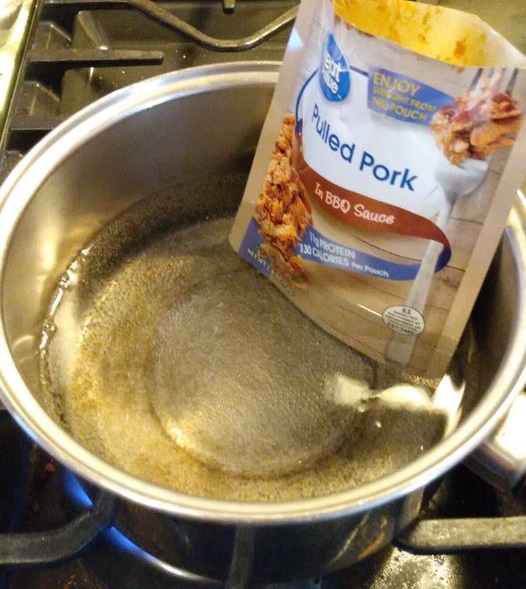
PulledPork2Another item recently caught my eye, and that was the pouch of Great Value Pulled Pork in BBQ Sauce from Walmart. Its already cooked, so it only needs to be warmed up. Of course, in an emergency, it could be eaten cold. It’s best on a bun, but any kind of bread or crackers would work fine.  You could also eat it right out of the pouch, or together with one of the other dishes in the survival kit, such as the rice or mashed potatoes.

To test it at home, I was originally going to heat it up in the microwave, but I realized that I should just warm it up as I would in the car. Since I have in the survival kit an emergency stove and a pan, I decided to duplicate this at home. To keep from getting the pan dirty, I heated up water and simply placed the pouch in the water. Of course, in an emergency, if water is short, you can still use the water for drinking or cooking. More likely than not, if I had to heat it up in the car while stranded, I would be using melted snow.

The finished product was better than I expected. It made a reasonably filling lunch, and in an emergency, a hot sandwich (or even just hot meat out of the pouch) would seem luxurious.

This product wouldn’t be viable for a large portion of your emergency food storage. The 2.8 ounce pouch cost $1.28. It provides 11 grams of protein, and only 130 calories. By contrast, a jar of peanut butter, for only a little bit more money, provides 2520 calories and 98 grams of protein. According to Harvard University, the recommended daily protein intake is 0.36 grams per pound. So a person weighing 150 pounds should get about 54 grams per day. This means that for long-term storage, the peanut butter is a much better value. But for a day or two, the pulled pork would add a few calories to your diet, provide a welcome hot meal, albeit a small one, and provide you with some protein. And it’s quite possible that the contents of the car witner survival kit will be frozen when you need them. Thawing a pouch of meat is probably a lot easier than figuring out how to thaw a jar of peanut butter.

The package I bought had a “best by” date of November 2024, almost three years in the future. So I’ll definitely be tossing some in the car survival kit. I hope I don’t have to use them until a future family survival picnic.

Incidentally, if the package looks familiar, that’s because this type of packaging is also used for tuna, another possible choice for the survival kit.


Some links on this site are affiliate links, meaning this site earns a small commission if you make a purchase after clicking the link. However, the Walmart link above is not an affiliate link.

Ration Challenge: Implications for Emergency Preparedness

The rice and lentil soup that I enjoyed most of this week.

The rice and lentil soup that I enjoyed most of this week.

Today, I complete the Ration Challenge. For the past seven days, my diet consisted of the same rations provided to Syrian Refugees in Jordan. This is a fundraiser for Church World Service. You can make your donation at this link:

I did get a bit of variety, such as a can of sardines, a couple of eggs, and a potato.  But for the most part, my “staff of life” was  ricechickpeas (garbanzo beans), and  lentils.  For the week, I had about three pounds of rice, 3 ounces of dried chickpeas, and 6 ounces of lentils.  Each day, at least one of my meals consisted of a soup with these ingredients, flavored with chicken bouillon.  I also had three cups of flour (which I turned into the flatbread shown above), but most of my carbohydrate needs came from the rice.

My soup was satisfactory, but many other participants were able to come up with much more creative recipes for the ingredients.  You can see many of them in their Facebook group.

One of the focuses of this website is emergency preparedness, and it didn’t escape my notice that these ingredients would form an inexpensive base for emergency food storage.  They do require cooking, but they are inexpensive and have a practically indefinite storage life.  These ingredients fed me relatively well for seven days.  For one year, I would need the following quantities:

At today’s normal supermarket prices, these ingredients would cost about $125.  And chances are, by shopping around and buying larger packages, the cost would be even lower.  (Even though I didn’t add it to my soup recipes, one of my major sources of calories this week was the 12 ounces of cooking oil.  That works out to about five gallons per year, which would add approximately $30 at typical supermarket prices.)    One would not eat well if these were the only things you had to eat, but this relatively small expense would guarantee that one person would have minimal nutrition for a full year.  It seems like a cheap insurance policy.

For those of us in places like North America and Europe, it seems inconceivable that we might become “refugees” and have to worry about finding enough food to eat.  But I suspect that most of the Syrian refugees in camps in Jordan didn’t think so either.  Most of them were probably living middle-class lifestyles at some point.  They weren’t always refugees, just as you and I are not refugees today.

If we take a little bit of time to plan ahead for emergencies, we can help ourselves at the time of some future disaster.  But more importantly, we can be in a position to help our friends and neighbors.

And if you are able, please make a donation to help today’s refugees through Church World Service at this link:


Some links on this site are affiliate links, meaning this site earns a small commission if you make a purchase after clicking on the link.

Sending Sourdough Yeast by U.S. Mail

BreadSeveral weeks ago, I wrote about my experiences using sourdough started with commercial yeast. While it’s starting to show up again in supermarkets and it’s apparently now available again on Amazon, yeast is not always available. In a long-term food emergency, that could pose a problem. Flour is inexpensive and plentiful, but in order to turn it into bread, you really need yeast. Fortunately, as I wrote previously, you can grow your own at home. You just need one package of commercial yeast, and you can turn it into an infinite supply.

You can also share your sourdough starter with neighbors. But I wondered whether it was possible to share with people who live further away. I asked for volunteers, and got two. I’ve now heard back from one of them, and it turns out that yes, you can share your yeast with anyone, courtesy of the U.S. Mail.

I spread a thin layer of the sourdough starter, about three inches by three inches, on a piece of parchment paper, and then left it to dry. In a couple of days, I removed it and broke it into two pieces, one for each recipient. I could have just as easily used wax paper, plastic wrap, or even just a plate.  After drying, I placed them in plastic sandwich bags, and placed those inside envelopes which I mailed.

My suggestion when they received them was to put it in a glass of sugar water to bring the yeast back to life. Then, use that water in place of some of the water and yeast in a bread recipe.

The loaf of bread shown above was baked by my cousin in Oregon, after she received it in the mail from Minnesota. She did report that the bread didn’t rise as much as expected. But it did rise some, even though it was denser than usual.

This is my experience as well. The yeast that are growing today, the descendants of the ones I started with, aren’t quite as active. It does take longer for bread to rise. But she reported that the bread tasted good.

The other package went to a friend in Alabama.  He reported that the yeast survived the trip and came to life when he added sugar water, although I don’t think he’s made any bread with it yet.  If he does, I’ll also post the results here as well.


Sourdough Cooking

SourdoughBreadWith the COVID-19 pandemic, many Americans are learning for the first time that the food supply chain can be tenuous. Fortunately, many of them are also learning that by keeping a few basic ingredients on hand, it’s possible to eat well. But one must take the time to turn those ingredients into food. There’s a bit of a learning curve. I’m by no means a master chef, so if I can do it, it means that just about anyone can do it.

One item that has been in short supply is yeast, or some other leavening agent such as baking powder or baking soda. No matter how much flour you have, if you don’t have a leavening agent, it’s very difficult to bake anything. We have plenty of baking soda and baking powder, although it won’t last forever. Before the pandemic hit, we had only a little bit of yeast on hand, and it’s been more or less impossible to buy it. Fortunately, however, you only need a little bit. And with minimal effort, the yeast will indeed last forever.  Several weeks ago, I used one package of store-bought yeast and used it to make sourdough starter.

The sourdough “purist” will cringe when I say that I used commercial yeast to make sourdough. I admit, this is cheating, and it’s not “real” sourdough. But it doesn’t have to be “real” sourdough.  I’m simply growing my own supply of yeast which can be used in perpetuity.  The descendants of the yeast organisms that I started about two months ago are still going strong, and I now have an infinite supply.  If you aren’t as lucky as me to have a package of commercial yeast, or if you’re a purist and don’t want to cheat, my friend at Successfully Living Simpler shows how to capture a wild yeast culture courtesy of a potato.

Several weeks ago, I started my sourdough starter by mixing one package of yeast, one cup of water, and one cup of flour.  Stir these together in a glass or plastic bowl, and then let it sit out on the counter for a day or two.  Bubbles will form as the yeast eat the flour and produce alcohol and carbon dioxide.  Periodically, you skim off the alcohol and discard it.  If you’re making beer or wine, you would use that, but I’m not that advanced.  You stir it occasionally.  After a couple of days, you can store it in the refrigerator.

To use the sourdough starter, you take a cup of the mixture for use in recipes.  You replace it by adding another cup of water and another cup of flour.  You stir the starter and leave it out again for a few hours, after which you can refrigerate it again.

I’m not sure how important this is, but I’ve been told not to use a metal bowl or metal utensils.  I keep the starter in a glass bowl, and use a wooden spoon to stir it.  I’ve also been told not to use chlorinated tap water.  I don’t know how important that advice is, but we have some bottled water, so I use that.  If I didn’t have bottled water, I would leave some tap water out overnight for the chlorine to evaporate.  If it’s rainy season, you could use rain water.  If you have a well, you could use well water.

I’ve used this starter now to make several recipes of pancakes, bread, and today, cookies.

Sourdough Pancake Recipe

Sourdough pancakes are easy.  You just take a cup of the starter and add a cup of water and a cup of flour.  If you have an egg, add that as well.  Stir, and cook on the griddle as you would any other pancake.  You do need to replenish your starter every few days by removing some and adding new flour and water.  Making a batch of pancakes is the fastest way to keep your starter going.

We started our coronavirus quarantine with a bread machine, but that died on us after the first loaf.  It had sat for many years, and I guess the disuse is what did it in.  It doesn’t matter, though, since making bread the conventional way, I’ve discovered, is quite easy.  As I mentioned above, I’m not a master chef.  And so far, every loaf has come out looking a little bit different.  But they’ve all been good, if I do say so myself.  And bread is easy to make, it turns out.

Sourdough Bread Recipe

Start with one cup of the sourdough starter.  To this, add about 1-1/4 cup warm water.  Add 3 tablespoons + 1 teaspoon sugar, 1 tablespoon salt, 2 tablespoons vegetable oil.  Mix these ingredients, and then start adding flour.  You’ll use a total of about 6 cups of flour.  Start with about 2 cups, and add about 1/2 cup at a time.  At some point, the mixture will stop being a liquid and become, well, a dough.  At that point, you remove it from the bowl and work on a flat surface.

At this point, you kneed the dough with your hands.  I flatten it, sprinkle some flour onto the top, and then fold it together until that flour dissolves.  Keep going until it seems to have about the right consistency.  You’ll learn this with experience.  If the mixture is too sticky, it needs a little more flour.  If it’s too dry, then it needs a little more water.  You played with Play-Doh as a kid, right?  When you have the mixture just right, it will have about the same consistency.

This whole kneeding process takes about 10 minutes.  When you’re finished, you’ll have a big ball of Play-Doh, er, I mean Real-Doh.  Place it in a large greased bowl and cover it with a cloth or paper napkin or towel.  Put this in a relatively warm spot in your kitchen.  At this point, you take a rest, and your yeast will get to work.  Let the dough rise for about two hours.

After two hours, you remove the ball from the bowl and place it again on a flat surface.  Before doing so, lightly dust that surface with flour.  Now, you “punch down” the dough.  Just take your fist and flatten the dough the best you can.  Push it into a somewhat rectangular shape and cut the sheet of dough in half.  A spatula works well to make the cut.  Each one of these halves will soon go into a loaf pan that has first been greased.

Turn each of these halves into the shape of a small loaf.  I found that taking the rectangle and folding it into thirds works the best, as if you were folding a sheet of paper to put into an envelope.  Tightly press down so that most of the air inside the folds is pressed out.  Then, put the loaf inside the loaf pan.

At this point, you take another break while your friendly yeast do the work for you.  Cover the pans with a cloth or paper napkin, and let them rise again for about 90 minutes.  Then, preheat the oven to 375 degrees, and put the pans in to bake for about 30-35 minutes.  When done, remove from the pans and allow the loaves to cool.  From very basic ingredients that cost only pennies, you now have two delicious loaves of bread, as pictured at the top of the page.

Today, I decided to make some cookies using sourdough.  Normally, cookie recipes call for baking powder and/or baking soda as the leavening agent.  We are fortunate to have both ingredients in the house, but some might not be as lucky.  My quest today was to see if I could bake cookies using instead the sourdough starter.  It turns out this is possible, and they tasted very good, if I do say so myself.  They are shown at the bottom of the page.

Experimental Sourdough Peanut Butter Cookies

Start with one cup of sourdough starter.  Add 1 cup of peanut butter, 1/2 cup of vegetable oil, 1-1/2 cup sugar, and 2 eggs.  (I realize that in a food emergency, those fresh eggs might not be available.  You could substitute powdered eggs, but they generally aren’t available now.  In other recipes, I’ve substituted applesauce or canned pumpkin for the eggs, and I’m guessing that would work in this recipe as well.)  If available, add 1 teaspoon vanilla.  Stir this together, and add 1/2 teaspoon salt.  When mixed, start adding flour.  You’ll need about 2 cups total.  Start by adding one cup, and then add a little bit at a time.  The mixture will get thick, but you should be able to stir it with a spoon.

When mixed, place balls about one inch in diameter on a cookie sheet.  Flatten these balls with a fork, and bake at 350 degrees for about 14 minutes.  The recipe will yield about 30 cookies.

As with the bread, the cookies were quite good, if I do say so myself.  In fact, I might have stumbled upon a secret recipe.  As I sampled these, it occurred to me that the taste and texture seemed very familiar.  It finally dawned on me that they were identical to Grandma’s Peanut Butter Cookies, the type that is ubiquitous in office vending machines.  That product lists somewhat different ingredients.  In particular, it lists baking soda, but no yeast.  But as far as I can tell, they are identical.

Substitutions should be possible with this recipe.  I used vegetable oil because it was the cheapest alternative, and we have a lot of it.  But butter or margarine would work as well or better.  The original recipe I found called for brown sugar, but I used white sugar because we had more of it.   Of course, if you have baking powder, you could use it instead of the sourdough starter.

The key thing about all of these recipes is that they use extremely simple ingredients, and ingredients that can be stored more or less forever.  A fifty pound bag of flour will keep your family well fed for weeks, as long as you have a few other ingredients.

I hope I’m wrong, but I’m afraid there will be food shortages this summer.  If you keep some basic ingredients on hand, you can perhaps avoid a life-threatening emergency for yourself, your family, and even your friends and neighbors.

SourdoughCookies

Some links on this page are affiliate links, meaning that this site earns a small commission if you make a purchase after clicking on the link.


Product Review: Walmart Equate Plus Nutritional Shake

UpdateThis page was written pre-COVID, and in the intervening years, only the chocolate, vanilla, and strawberry flavors are available.

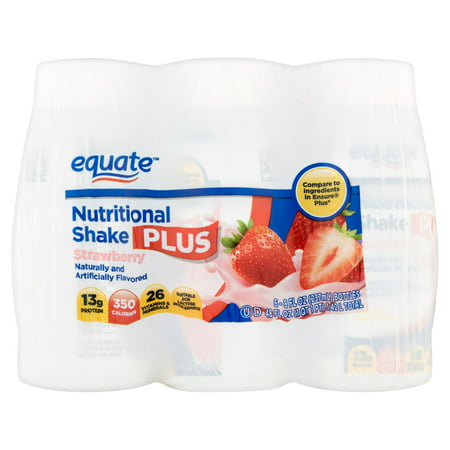
As I’ve previously recounted, I was quite sick just over a year ago and was hospitalized.  In the process, I lost a lot of weight, and needed something to provide easy nutrition.  As a result, I became something of a connoisseur of nutritional drinks, the most familiar brand names being Ensure and Boost.  These products are designed to partially replace part of one’s normal diet.  They generally contain a warning that you shouldn’t use them as your sole source of nutrition without consulting your physician, but they are a good supplement to ensure you’re getting adequate calories and nutrition.  Most, for example, provide about 350 calories.

As I discovered, some tasted better than others.  My health has recovered, and I guess there’s really no medical need for the added nutrition.  But I like them, and they make an extremely convenient breakfast if I’m in a hurry.  The 350 calories keep me going even if I don’t have a chance to eat anything else.  They’re now part of my routine.

The major brand names tasted OK, but I also sampled some of the store brands.  Initially, the Walgreen’s store brand was my preferred choice.  Unfortunately, however, at some point they changed the formula.  The old version’s label stated that it provided 25 vitamins.  The new label proudly proclaimed that it now had 26 vitamins.  Unfortunately, the changed formula didn’t taste as good.  So I had to do more shopping, and tried the Walmart store brand.

Initially, I was a bit disappointed.  I bought the chocolate, and it wasn’t quite as good as the Walgreen’s brand.  It’s hard to articulate, but something about the chocolate flavor seemed a bit artificial, and the overall experience wasn’t as “smooth” a taste as I wanted.  Fortunately, however, I decided to try some of the other flavors.

My favorite was the mocha flavor.  If you like coffee, you’ll like this flavor.  The addition of the coffee flavor brings back the “smoothness” that was missing in the plain chocolate.  In fact, if you ordered an iced mocha at Starbucks and they served you one of these, you would be quite satisfied.

I also enjoy the strawberry and banana flavors.  It’s also available in vanilla, but I haven’t had a chance to try that flavor yet.  While they can be consumed at room temperature, they are best served chilled.  Refrigeration of the unopened bottle is not necessary, so they’re handy to keep a few on hand.

If you’re looking for a product with fewer calories, the Walmart brand, as well as most of the other brands, offer an “Original” version.  The “Plus” version is 350 calories, but the “Original” version is 220.  Look for the words “Plus” or “Original” on the label, or glance at the Nutrition Facts label to make sure you’re getting the 350 calorie version.

I much prefer the Walmart store brand to the name brands.  As an added bonus, as you might have guessed, the store brand is also cheaper.  Tastes may vary, but if you or a loved one have been prescribed a nutritional drink, you’ll want to consider trying this less expensive store brand.  In addition to saving a little money, you very well could prefer it.  And if you’re a busy person and might occasionally miss a meal, it’s not a bad idea to keep one in the back of the fridge, or even in your desk at work, to quickly give you the nutrition to keep going.

And while one of these products is too expensive to buy in bulk for emergency food storage, it might fill a niche, and keeping some on hand for emergency preparedness purposes might be prudent.

Some links on this page are affiliate links, meaning that this site earns a small commission if you make a purchase after clicking on the link.


Canned Bacon: 1919 and 2019

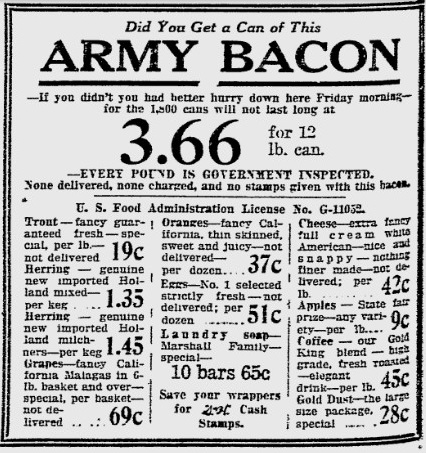
1919Sept25MilJourFullAd1919Sept25MilJourWith World War 1 soldiers on their way home or already there, the U.S. Army had some surplus commodities to get rid of a hundred years ago, and that included bacon. This ad appeared in the Milwaukee Journal a hundred years ago today, September 25, 1919, for the Boston Store in Milwaukee.

The store offered mostly dry goods, ranging from from toilet paper (6 rolls for 19 cents) up to a player piano ($395).  They also had a limited selection of food items, apparent “loss leaders” to get traffic into the store, shown at left.  And, of course, what stands out is the twelve pound can of army bacon for $3.66.  That, of course, is before a century of inflation, but a good way to put old prices in context is to remember that the money was made out of silver, so that the $3.66 really meant about 3.66 ounces of silver.  Today, that would be about $60.

That’s still a reasonable price, however.  The current WalMart price for 12 pounds of bacon is about $53.  That bacon, of course, isn’t really suitable for long-term storage, whereas the 1919 product was canned.  Interestingly enough, though, canned bacon is still readily available, and can be purchased at Amazon.  As you can see below, it’s rather expensive, especially considering that this price is for a nine ounce can:

On the other hand, for your emergency food storage needs, it might fill a niche.  According to the reviews, the product is excellent, and the 9 ounce can contains about 50 slices of bacon.  So having a can or two in the pantry might not be out of the question.

Since the modern product has 50 slices in the 9 ounce can, this means that the 12 pound can from 1919 contained several hundred slices.  So it probably was worth racing down to the store to get a couple cans.

If you’re looking for more ideas for protein for your home food storage, the most economical is probably dry beans or perhaps peanut butter.  If you crave real meat, one of the cheapest is probably tuna.  Other good options are potted meat, canned chicken, or, of course, the venerable Spam.  But if you want to get a can or two of canned bacon, I can’t blame you.

For more information about emergency food storage, see my food storage page.


Product Review: Wise Food Storage “Savory Stroganoff”

One of this site’s advertisers is Wise Food Storage, who recently sent me a free sample to review.  The company supplies dehydrated food for emergency food storage, camping, and backpacking.  On their website, they sell mostly packages consisting of assortments of food, such as the package shown below, which is billed as providing enough food for two people for 72 hours:

72 Hour Kit for 2 PeopleTHe sample I was sent was a single meal, namely their “Savory Stoganoff.”

I was initially a bit skeptical, since my experience has been that most suppliers of “survival” food seem to charge a considerably higher price than one would pay for comparable items at the supermarket.  In many cases, they hide the higher price by making inflated claims as to how long the product will last.  For example, some companies offer a “30 day supply” of food, but if you look carefully, you realize that you would be eating starvation rations for those thirty days.

It was refreshing to see that Wise doesn’t follow this same practice, and the claims on their website are reasonable.  A normal diet consists of about 2000 calories per day.  You can certainly survive on less, but if you want to replicate a normal diet as much as possible during an emergency, you should plan on having about that many calories per day per person.  And Wise seems to use honest figures on their website.   For example, the 72 Hour Kit for 2 People shown above supplies over 13,000 calories, which is indeed enough to feed two people for three days, with their normal caloric intake.  In fact, with a bit of scrimping, it would probably last even longer than advertised.  It is refreshing to see a company that didn’t fall into the trap of making exaggerated claims.  As you shop around, you might see lower prices.  But before you buy, make sure you’re really getting the number of days’ supply that the company is claiming.  In Wise’s case, you are.  In the case of some other suppliers, you are not.

I’m not normally a fan of “kits” for food storage.  From a price point of view, you’re probably better off buying normal food from the supermarket.  You’ll know that they are items you like to eat, the cost will be lower, and the supermarket has many items that can be stored for a long period of time, especially if you rotate them into your family’s normal diet.  On my food storage basics page, I have ideas for emergency food storage using items available at any supermarket.

On the other hand, there is something to be said for buying a well thought out “kit.”  You know that everything is optimized for long-term storage and minimal preparation.  And there’s something reassuring about looking at a single container and knowing that it will give you enough food to eat for X days.  I wouldn’t recommend a kit as your family’s sole source of emergency food, but they do have their place.  In addition to Wise’s 72 Hour Kit, they have a variety of other similar assortments. such as a 1 Month Emergency Food Supply for 1 Person – 56 Servings and a 2 Week supply geared for backpackers.  Again, you can probably put similar kits together yourself at a somewhat lower price, but for some people, the convenience is worth it.

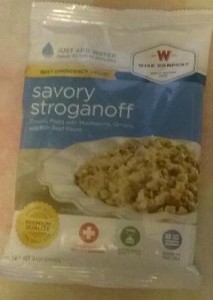
Package of Savory Stroganoff being reviewed.

Package of Savory Stroganoff being reviewed.

Wise’s website doesn’t seem to sell individual meals, but they are available from WalMart.  For example, you can purchase a single package of the “Savory Stroganoff” reviewed here.  The price is quite reasonable, and you can order online and have it delivered to a local WalMart, so there is no shipping cost.

The Savory Stroganoff I reviewed exceeded my expectations.  I wouldn’t describe it as a gourmet meal, but it was reasonably good tasting, easy to prepare, and would be quite adequate during an emergency or while camping.  The nine-ounce package was billed as having a storage life of 25 years.  It was packaged in a heavy plastic pouch with an oxygen absorber inside (and I’ll say more about the oxygen absorber in a moment).  According to the nutrition facts, the package supplies four servings of 250 calories each.  In other words, the one package contains a thousand calories, or about half of one person’s caloric needs for the day.  We did feed four people lunch using the one pouch, and the meal was filling.  Each serving contains 45 grams of carbohydrates, 4.5 grams of fat, and 7 grams of protein, so it’s a reasonably well balanced meal by itself.  The vitamin content is relatively low, supplying 0% of the daily requirement of vitamin A, 2% of the daily requirement of vitamin C, 8% of the calcium, and 8% of the iron.  During a short-term emergency, vitamin deficiency isn’t an issue, but those planning for a longer-term emergency would be well advised to include some multivitamin tablets if relying on this kind of storage food.

The main ingredient is the pasta, along with nondairy creamer and textured vegetable protein.  You can view the full list of ingredients and nutrition facts at the WalMart website.

Preparation was very straightforward, and we followed the instructions on the package exactly.  You start by boiling four cups of water, turning off the heat, and then adding the contents of the package to the boiling water.  We used the stove, but the water could be boiled by any emergency heat source.  Since the only actual cooking is the boiling of the water, there’s really nothing that can go wrong.  You simply cover the pot and wait 12-15 minutes.

The glitch in the instructions was that it didn’t mention the oxygen absorber inside, so we wound up pouring it into the boiling water, where we had to fish it out.  But other than this oversight, the instructions were self-explanatory.

After 15 minutes, you remove the cover, and let it stand for another 2-3 minutes.  We used a normal kitchen pan, but any container with a lid could be used.  In an emergency, to minimize the amount of cleanup, I would boil the water in one container, and then “cook” the food in some kind of disposable container.

The completed Stroganoff.

The completed Stroganoff.

The finished product didn’t look particularly appealing.  Perhaps it would have looked better if we had let it sit a while longer, but it was rather watery.  It looked more like a thick soup than Stroganoff.  It was best served in a cup or bowl and eaten with a spoon.

However, it tasted quite good, and neither my wife and I nor our kids had any complaints.  It did not have the “dehydrated” taste that I feared it would have.  It tasted like noodles and sauce.  There was a bit of seasoning–I noticed that the ingredients included dried onions.  However, it was rather bland, and adding a little bit of salt and pepper improved it considerably.  My daughter added a little bit of Knorr chicken bouillon, and she reported that this made it taste quite good.  So my main advice if you’re going to rely on prepackaged items like this, it would be a good idea to also include familiar seasonings.

In summary, the stroganoff tasted better than I expected without a “freeze dried” taste, and was more reasonably priced than I expected.  It’s more expensive than comparable supermarket items, but much less expensive than comparable items billed as “survival” or “backpacking” food.  I probably won’t order one of Wise’s food “kits,” but I’ll probably purchase a few packages of the stroganoff and other meals to keep in the camper, or just to keep in the house for times when a relatively quick meal is needed.

Full Disclosure:  The product reviewed was supplied to me free of charge by Wise Compnay, one of this website’s advertisers, in exchange for an honest review.  All product links on this page are affiliate links, meaning that if you click on the links and purchase the product, I will receive an advertising fee.

Click Here For Today’s Ripley’s Believe It Or Not Cartoon


Free Shipping on all Wise Food Storage Products!


SNAP Challenge 2015: The Final Day

Leftover staple items.

Leftover staple items.

Today marks the seventh and final day of my 2015 SNAP Challenge, where I’ve eaten for a week on less than $31.50, the average amount received by recipients of SNAP benefits, formerly known as food stamps. My actual expenditures were $27.99, which was up a bit from last year, but still well within the guidelines. As an added challenge this year, I concentrated mostly on foods that are suitable for emergency food storage.

20150124_180632Breakfast today consisted of oatmeal. For lunch, I finished the nachos and had another serving of biscuits and gravy.  Supper, shown here, consisted of the remaining burritos, and a quesadilla made with the remaining cheese sauce and tortilla.

Most of my leftover food is shown above. I still have at least a pound each of the flour and sugar, half a pint of the cooking oil, and half a pound of margarine. So I could easily subsist a few more days on what I have. But since the challenge ends at midnight, I’ll just rotate those remaining items back into our normal household pantry, and think about what I can do for future challenges.

20150124_180008As I did last year, I celebrated the end of the Challenge by baking a cake, shown here, using  this recipe.  About the time I was supposed to take it out of the oven, I realized that I had forgotten to include the margarine called for in the recipe.  Even though the cake wasn’t as good as last year, it was surprisingly good despite this omission.

I should note that the recipe called for two eggs, and I only had one.  Over the last year, there has apparently been inflation in the price of eggs.  Last year, a dollar bought eight, but this year, I only had six eggs.  Therefore, I had to include one egg from the normal household supply.  But I’ll be sharing more than half the cake with the rest of the family.

I have five hours to go, but there’s no question that I’ll survive.  I still have about a dozen cookies to tide me over, as well as several biscuits.  I also have about a fourth of my can of coffee remaining.  In normal use, my 10.5 ounce can wouldn’t have lasted the week, but with a bit of rationing, I had plenty.

I’ll probably have some concluding thoughts in a few days, but this concludes my SNAP Challenge for the year.  Tomorrow, we’ll resume our normal programming, and look at why a Boy Scout a hundred years ago took it upon himself to have a Merit Badge requirement changed.

Click Here For Today’s Ripley’s Believe It Or Not Cartoon


SNAP Challenge 2015: Day 5

20150122_160043I didn’t really have breakfast this morning, other than coffee.  Lunch consisted of leftover Ramen noodles, with some of the mixed vegetables mixed in, along with the leftover pig in blanket from a couple of nights ago.

Since I didn’t have much of a lunch, I also had an afternoon snack consisting of the nachos shown above.  I’m concentrating on storage food for my challenge this week, and the chips aren’t a particularly good long-term storage item.  But they do have a reasonably long shelf life, and they’re the kind of thing one might find around the house in an emergency.  For long-term storage, they could, of course, be made with stored ingredients.  Yesterday, I discussed how tortillas could be made from Maseca and water.  The tortillas can be cut into chips and deep fried to make tortilla chips.

Canned cheese sauce.

The  canned cheese sauce, on the other hand, is an excellent storage item.  A few days ago, I used it to make a passable pizza.  It wasn’t intended for that purpose, and although it made a fairly good pizza, the result was unusual looking.  But today, I was using the sauce for its intended purpose, and it made a very good snack.

The cheese sauce is relatively expensive (about $2.50 per can), so it’s probably not an economical option if you plan to use it regularly on a long-term basis.  However, having a few cans in your pantry can allow you to make some good comfort food in case of emergency.

For long-term storage, a very good option for some of your dairy needs is Honeyville powdered cheese.  This product appears to be very similar to the cheese powder that comes with boxed macaroni and cheese.  For about $21, you get a lot of this powdery substance, a can containing 41 servings of 140 calories each.  It can be used for things such as macaroni and cheese (although the boxes of macaroni and cheese are probably cheaper), and also makes a quite good cheese sauce.  I’ve found that the consistency is thicker than cheese sauce, so it actually makes a better dip.

According to the instructions on the can, you simply add hot water.  It’s not salted, so you will want to add salt.  And I’ve found that the final result is better if you add a little bit of milk and butter or margarine.

A few cans of the  cheese sauce are certainly helpful for emergency storage.  But over the long term, the Honeyville powdered cheese would allow you to augment your dairy storage with something with an essentially infinite shelf life.

20150122_180510

Supper is shown above.  I made another batch of biscuits and had biscuits and gravy, using the gravy mixicon and water.  I also had some of the canned vegetablesicon and a couple of slices of the Armour Treet.  I washed it down with coffee and Kool-Aid.  I am very full after this dinner which consisted entirely of canned and dried ingredients.

I also have plenty of leftovers, such that I don’t think I’ll need to do much cooking for the final two days of the SNAP Challenge.  I have leftover burritos, pizza, and biscuits and gravy in the refrigerator, but I also have additional ingredients in case I want to try something else.  I’ve almost finished my second batch of cookies, so I’ll probably make one more batch.  The largest downfall for most SNAP Challenge participants seems to be the failure to recognize the people often eat between meals.  And having the cookies available makes the challenge much more manageable. icon


Click Here For Today’s Ripley’s Believe It Or Not Cartoon