As I write this, snow is once again forecast for my region. Since the calendar says that it’s the first day of spring, it’s likely that the snow will be little more than a temporary inconvenience.
But I was recently reminded that a snowstorm wasn’t always just a minor inconvenience, and I learned about one of the Midwest’s largest winter storms ever, the blizzard of January 2-5, 1949.
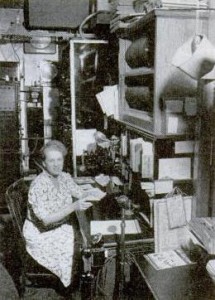
Ida McNeil, KGFX.
I don’t think I had ever heard about this storm until I had a comment on my post about KGFX, a one-woman broadcast station run out of the home of Ida McNeil in Pierre, SD. As I mentioned in the previous post, Mrs. McNeil did take commercial advertising, but she viewed the station mostly as a public service. And this is borne out from the story of the 1949 blizzard shared by reader Dwight Small:
I well remember her broadcasting during the blizzard of 1949. We were completely snowbound on the former Hugh Jaynes ranch 15 miles NNW of Pierre. She was our only window to the outside world for at least a couple of weeks. We had no electricity but the battery powered radio lasted sustained our spirits. We learned from her that there were hundreds of others in the same boat.
I did some research about the storm, and it appears that many were, indeed, in the same boat. The winter of 1948-49 was severe in many respects, but it delivered it’s biggest punch to the northern plains in the early days of January, 1949.
The April, 1949, issue of QST describes its entry to South Dakota:
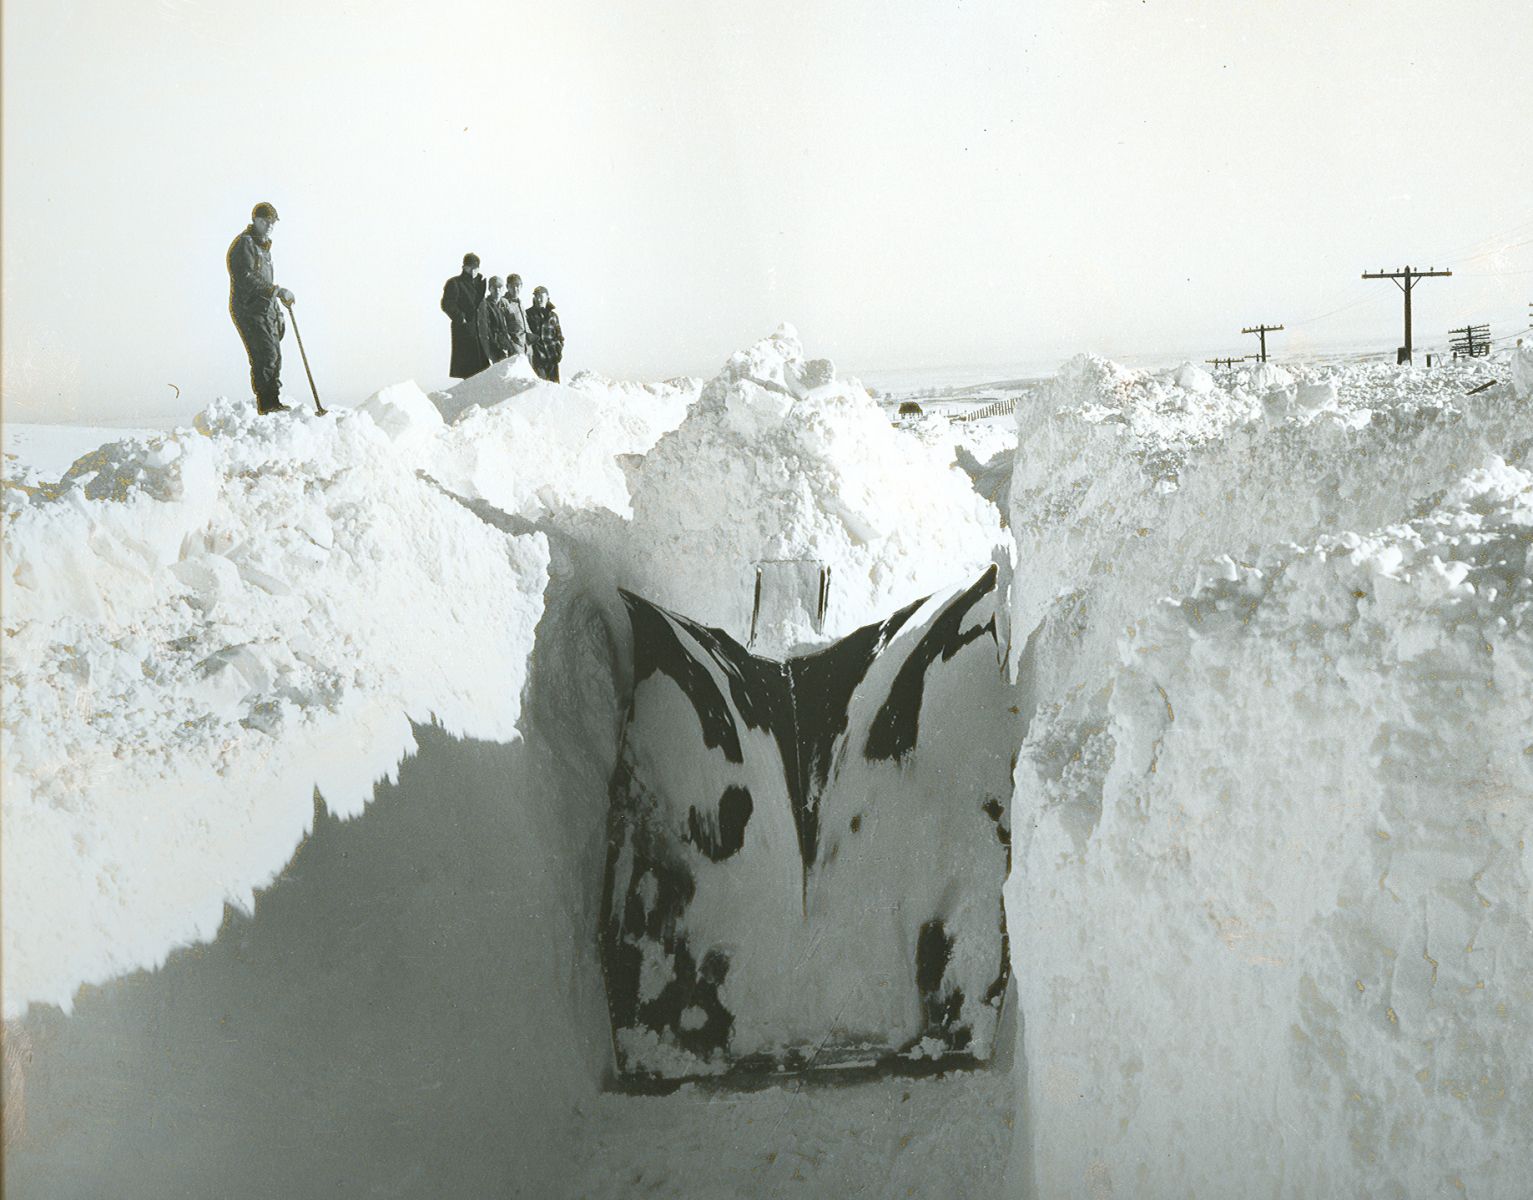
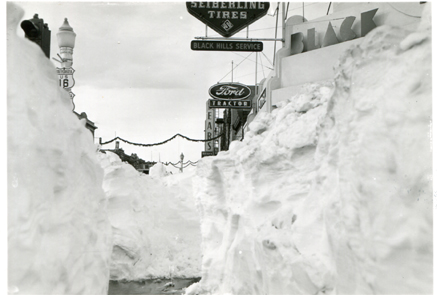
Things began on the morning of January 3rd in South Dakota, when KOTA, Rapid City’s broadcaster, let loose with the first hint that the impending storm was to be of record-breaking proportions. Unfortunately many ranchers, traveling people and others failed to hear the broadcast warnings and were totally unprepared for what was to come. It started coming down on the 3rd, and continued until about noon on the 5th. The actual snowfall was not of record-breaking proportions, but high winds, sometimes in gusts of 65 to 70 miles per hour, piled the snow into mountainous drifts, oftentimes 30 to 50 feet deep.

 Many others found themselves isolated by the storm. In 2013, the Rapid City Journal carried the reminiscence of schoolteacher Grace Roberts, who was stranded at her post in Creighton, a small town about 25 miles north of Wall. She and her four-year-old daughter made it to school, but then found themselves trapped there for 38 days. The road to the school was plowed a few times, but was quickly covered over with snow.
She reminisced in 2013 that she ate a lot of canned soup, but managed due to the kindness of neighbors, the closest of whom was a mile away. The neighbor would ride over on horseback, “and when his wife baked bread he’d bring us some bread or when he milked a cow, he would bring some milk.”
The school had a small bed, and was well stocked with coal. They also had a battery radio, and would listen occasionally, but mostly passed the time by talking and reading.
Another survivor, Everett Follette of Sturgis, like many South Dakotans, had a phone line that kept working through the storm and served as the lifeline. Interestingly, though, Follette recounted in 2009 that the family also had a battery-powered radio, “but the only station they could tune in came from Bismarck, N.D.”
The family used as much milk and cream as they could from their dairy farm, but with roads impassible, they had to dump the excess. Eventually, the Sturgis creamery called about the availability of milk, and made a deal to follow a military snowblower. When neighbors learned that the truck was coming, they quickly phoned the grocery store in Sturgis to have groceries delivered.
As might be expected, hams sprang to action to deal with the communications needs of the region, as detailed in the April 1949 issue of QST. In South Dakota, when the snow first started coming down, W0ADJ and W0CZQ made arrangments with the Air Force base to maintain contact with the base at Colorado Springs, “just in case.” Hams also played a role in coordinating the massive air operations after the storm had passed. Planes were used to search for survivors and drop supplies for both humans and livestock.
Broadcast stations advised incommunicado ranchers of which marks to make in the snow to request drops of feed and other supplies.
One of the most dramatic uses of amateur radio took place in Ogallala, NE, a town of about 3000 in western Nebraska. A train was stalled in the snow west of town, and a major transcontinental highway was blocked. State snowplows managed to break through, and led a mile-long convoy of cars into town. Suddenly, the town of 3000 was pressed into service to shelter, feed, and supply communications for an additional 2000 people.
The communications duties fell upon W0LOD, the town’s only ham, whose station was limited to running 50 watts with a single 807, and only on 40 meters. Despite his modest station, “all around W0LOD–north, south, east and west–were hams with sensitive receivers, and perhaps greater power, and, as the skip ebbed and flowed he was able to sit at his operating position handling emergency traffic in unbelievable quantity much as he had been accustomed to handle routine traffic night after night. It was a 48-hour session at the key, but no heroics, no frantic ‘QRRR’–just a traffic man doing that which he likes best.”
The April 1949 QST article tells of other storms that winter, many of which overlapped each other. For example, when railroad telegraph lines went down, hams were called upon to assist the railroads in keeping te trains running. In Kansas, W0EQD didn’t even realize that his town had been cut off from the outside world. The power was out, so he got his station running on the emergency generator and checked into the Kansas Phone Net, which had traffic waiting for the phone company. As soon as he delivered the message and local officials found out he was on the air, he was kept busy for the next 48 hours as his town’s only communications facility.
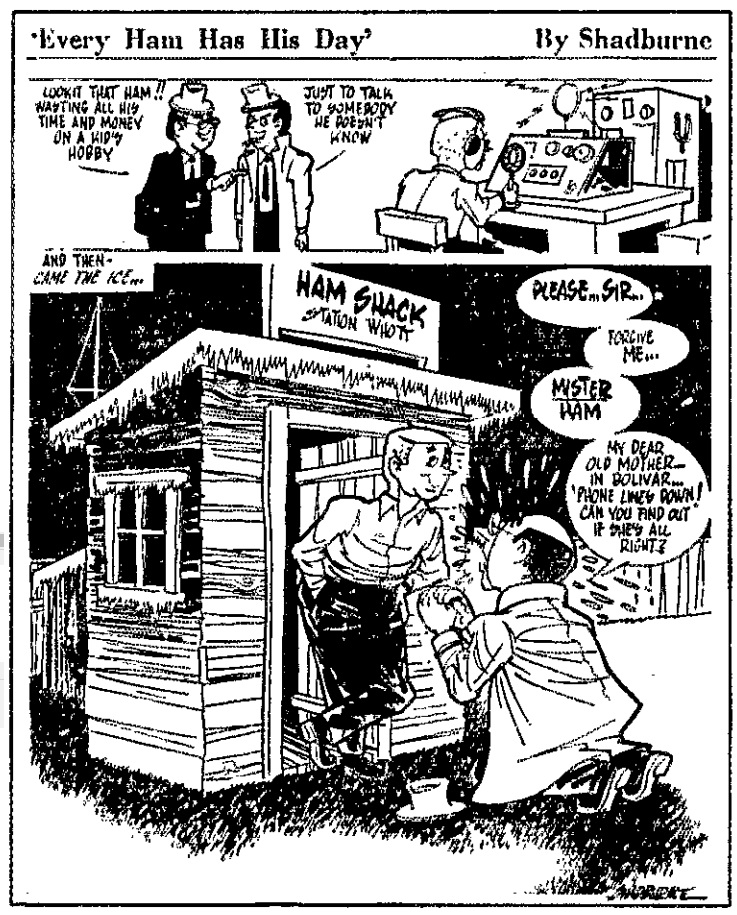
Missouri was hard hit by an ice storm on January 11, and many commercial telegraph lines were down. Western Union called on hams to deliver both company and weather bureau messages. The cartoon below appeared in the Springfield (Mo.) News & Leader, and was reprinted in QST. It shows a ham being scoffed for spending so much time and money to take part in a “kid’s hobby” only to talk to people he didn’t even know. But in the next panel, after the ice hits, the same man is begging the ham to get news of his mother who was cut off from the outside world.
References
It’s ‘Going Down in History”: The Blizzards of 1949. South Dakota History Vol. 29, p. 263 (1999).
Albert E. Hayes, Jr., W1IIN, Deep Freeze, QST, Apr. 1949, p. 35.
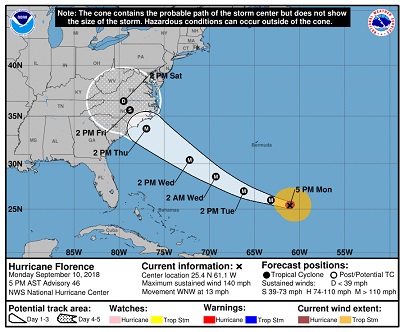
 If you have a shortwave receiver (or even if you don’t), here are some frequencies you can keep in mind for tuning in to information about Hurricane Florence. Modern news media do an admirable job of getting the information out, but there’s something to be said for being able to tune in first-hand reports directly.


