Category Archives: Science fair ideas

Science Fair Ideas: Fun With a Homemade Galvanometer

1942DecPS4
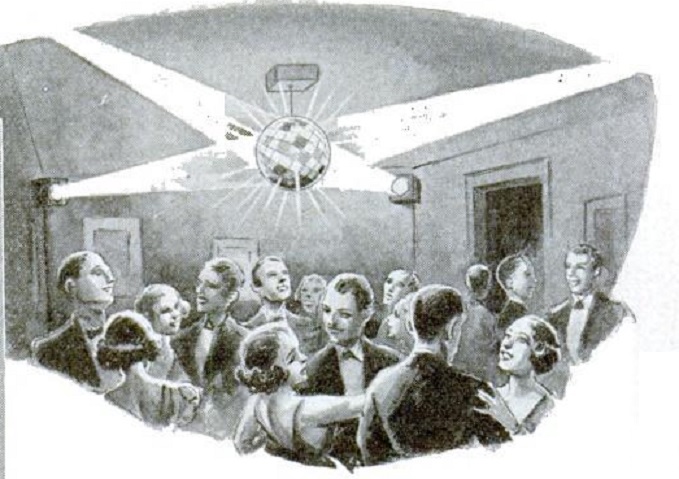
Eighty years ago, there was a war going on, but that didn’t stop young scientists on the home front from conducting experiments with the items available. If Junior’s science fair project is due tomorrow, he can take a cue, and whip together a great project from these ideas in the December 1942 issue of Popular Science.

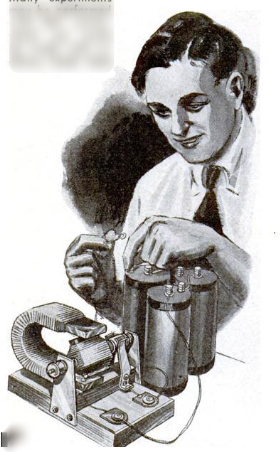
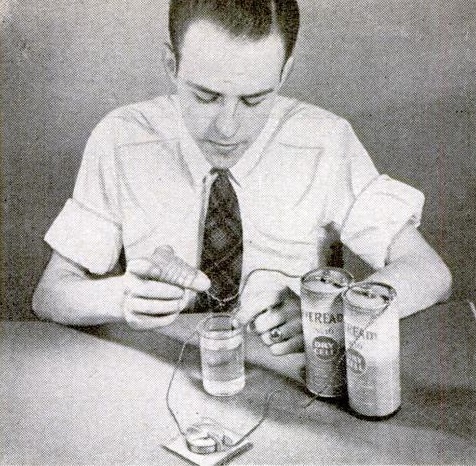
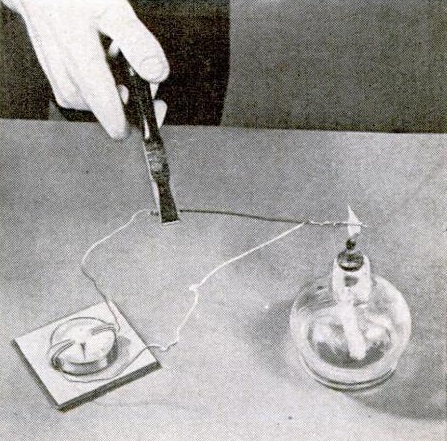
Both experiments involve a galvanometer, and the magazine presupposes that young scientists know how to make one, because the instructions merely state to use “your homemade galvanometer.” But in case Junior doesn’t know, it’s easy enough. You just take a compass (a toy one from the dollar store will work just fine) and wrap a few turns of wire around it. The smallest of electric currents will cause the compass to move.  If there’s a little extra time before the science fair, we’ve previously shown how to make a deluxe galvanometer.

In the first experiment, shown above, Junior can demonstrate that water, contrary to popular opinion, is an insulator. It’s only when a little bit of salt is added to the water that it starts to conduct electricity, and the compass moves. To accentuate the effect, we recommend starting with distilled water.  And don’t worry about not being able to find the old-fashioned dry cell batteries.  These experiments will work just as well with modern alkaline D cells, especially if you purchase battery holders for them.

The second experiment, shown below, shows how to make a thermocouple. Two pieces of wire–copper and iron (or steel)–are twisted together. When the twisted wires are put into a flame of a candle, the dissimilar metals produce an electric current, as shown by a movement of the compass.  And as we always remind parents about experiments involving flames, don’t forget to give Junior a box of matches!

As with many of our projects, Junior is almost guaranteed to take home the blue ribbon, and the teacher won’t have a clue that the project was put off until the last minute.

1942DecPS3


Some links on this site are affiliate links, meaning this site earns a small commission if you make a purchase after using the link.

1937 Disco Ball

1937DecPSWhat we know as the “disco ball” has a long heritage, as shown by this depiction 85 years ago in the December 1937 issue of Popular Science. The magazine featured a number of ideas on what to do with a broken mirror, and assured readers that it needn’t signify seven years of bad luck.

1937DecPS2The magazine noted that one use was to provide spectacular color effects for parties and dances. This was done by focusing colored spotlights on a mirror-covered globe. This was made by cementing small squares of mirror on a large ball or toy globe. This was attached to a spindle which could be spun by hand or with a small geared-down motor.

According to Wikipedia, what is now known as the disco ball dates back to 1917.

If you have a piece of mirror left over after making your disco ball, you can mystify your friends with the magic trick shown below:

1937DecPS3


Science Fair Ideas: 1937 Electric Motor

OnPaste.20221114-100337If Junior wants to impress the judges at the science fair with attention to detail, skill with hand tools, and a generally spectacular project, then this 1985 project is sure to fit the bill. It’s a small electric motor, capable of providing some motive power to other projects.

The diagram shows old-fashioned dry cells, but modern alkaline D cells will work just as well, especially if you get battery holders to keep them in place.

The November 1937 issue of Popular Science shows the complete blueprints for the motor, but without too many verbose instructions. So as long as Junior can read a set a blueprints, the blue ribbon is pretty much assured.

Screenshot 2022-11-14 10.17.35 AM


Some links on this site are affiliate links, meaning that this site earns a small commission if you make a puchase after using the link.

Science Fair Idea: Gravity Furnace

1942NovPSIf Junior is looking for a spectacular science fair project, they can’t go wrong with this project from 80 years ago, from the November 1942 issue of Popular Science.

Octopus furnace. Wikipedia image.

Octopus furnace. Wikipedia image.

It demonstrates how an old-fashioned “gravity” furnace works.  These are often affectionately known as an octopus furnace, since they had tentacles going from the furnace to each room. As shown clearly by this experiment, the air in the furnace heats up and rises. Then, when it gets to the room, it cools and returns through the lower set of pipes.

Such furnaces are out of favor, and I doubt if they are still manufactured. But there’s really nothing that can go wrong, so they still exist in some older houses. They are not as efficient as modern furnaces, but they have some advantages. Unless some electronic controls have been retrofitted, they don’t require any electricity to operate. In the event of a winter power outage (see our earlier post for more thoughts), modern furnaces would be useless, even if they burn gas or oil, since they need electric power to run the blower. But the old gravity furnace will keep the house toasty warm, even with no electricity. Back in the day, the homeowner would shovel coal to keep it going, although most were converted to gas or oil.

To put the experiment together, in addition to the items found around the house, Junior might need to purchase the following items. You can find them locally, but as with everything, you can also find them on Amazon, at the links below:

As with many of our science fair projects, don’t forget to give Junior a box of matches!


Some links on this site are affiliate links, meaning that this site earns a small commission if you make a purchase after using the link.

1937 Precision Sundial

1937OctPSaIf Junior decides to make a sundial for the Science Fair project, he or she could just order a kit from Amazon, slap it together, and hope for the best, undoubtedly a participation ribbon.

But if they have some basic mechanical aptitude, they can’t go wrong by putting together the advanced model shown here, from the October 1937 issue of Popular Science. This sundial will be able to read the correct time to within about a minute. It’s a bit more complicated to operate, but it’s quite easy once you get the hang of it.

The dial is fixed in place, with the axis pointed at the North Star. This means that the dial is mounted at an angle the same as your latitude, pointing due north. To read the time, you move the upper part of the dial so that the pointer P is casting a shadow on the figure-8 (known as the analemma.)

Once that shadow is positioned, then the time is read directly from the pointer T, which is pointing at the time. The article explains how to calibrate the dial, which has markings every five minutes. With these, you should be able to interpolate the time to within one minute. As an added bonus, the shadow on the analemma shows the approximate date.

Parts are all readily available.  The dial itself is a cake pan.


Some links on this site are affiliate links, meaning that this site earns a small commission if you make a purchase after following the link.

Science Fair Idea: More Conductive Flames

1937OctPSWe’ve previously shown a science fair project showing that a flame conducts electricity.  (And if you follow that link, you’ll see links to even more spectacular projects involving electricity and flames.)  But the one shown above, from Popular Science, October 1937, is even simpler.  Junior will undoubtedly amaze the teacher with the simple elegance, and very little preparation is needed.

Because the area around the open flame is conductive, the two strips of paper will quickly discharge in its presence.  But when the experiment is repeated with a screen between the paper and the flame, there will be no effect.

All you need is a candle, a couple scraps of paper, and an old piece of screen.  And, of course, don’t forget to give your young pyromaniac a box of matches.


Some links on this site are affiliate links, meaning that this site earns a small commission if you make a purchase after following the link.

Science Fair Idea: Lens Made of Air

1937AprPS1For the student looking for a simple science fair project that will mystify the teacher, you’ve come to the right place. When the teacher asks what scientific question(s) your project will demonstrate, you can propose the following:

Is it possible to construct a convex lens that will have a magnification factor of less than one? Is it possible to construct a concave lens that will have a magnification factor of more than one?

ConvexConcaveTo put it another way, a convex lens (such as the one on the left) makes things look bigger, and a concave lens (shown on the right) makes things look smaller. But your simple experiment will show that it’s possible to make a convex lens that makes things look smaller, and a concave lens that makes them look smaller.

A lens is usually made out of a substance such as glass, which is denser than air. This means that light waves travel more slowly through the lens. But there’s no reason why you have to use glass and air. In your case, you will use air for the lens, and water instead of the air. This means that the speed of light is faster through the lens, rather than slower, as we usually think of lenses.

The layout for the lens is quite simple, as you can see from the illustrations. You need a small1937AprPS3 can, covered on each side with a piece of cellophane. Any type of clear flexible plastic should work fine. The easiest option is probably cling wrap. You’ll need to cut a hole in the side of the can, and insert a flexible rubber or plastic tube. The connection needs to be air tight. There are probably other ways to make the connection, but the easiest would probably be to use a small brass tube, and solder it to the can.  (You’ll need a soldering iron, which probably costs a lot less than you would expect.)  Slide the plastic tube over the brass, and make sure the connection is water tight.  The construction details are shown at the right.

1937AprPS2If you blow into the tube, as shown in the illustration above, then the can becomes a convex lens, made out of air. And if you suck air out of the tube, as shown at the left, it becomes a concave lens. Place it in a container of water, and you can watch how a black stripe at the bottom of the container is magnified or made smaller, but the opposite of how it would work with a glass lens in air.

Your teacher will have to concede that there’s nothing in the definition of “lens” that requires it to be made out of glass. He or she will have little choice but to award you the blue ribbon for answering your questions in the affirmative.

The project appeared 85 years ago this month in the April 1937 issue of Popular Science.


Some links on this page are affiliate links, meaning that this site earns a small commission if you make a purchase after clicking the link.

Science Fair Idea: Re-orienting Your Globe

1972MarEE

Fifty years ago this month, the March 1972 issue of Elementary Electronics showed this idea to improve the utility of the globe in your radio room. Normally, the globe is mounted so that it spins just like the Earth–along its axis. But you’re not required to spin the globe, and it becomes more useful if you orient it so that it can turn along an axis through your location and your antipode–the point furthest away from you.  If you’re in North America, that would be somewhere in the Indian Ocean.

The advantage of doing this is that it quickly lets you see the direction and distance to any other point.  The thing holding the globe in place (known as the semi-meridian) is usually marked in degrees.  But you can tape a scale in miles to it, and if you rotate any point on the globe toward that line, you’ll instantly see the number of miles.

All you need to do is remove the globe from its mounting, which is usually just a matter of slipping it out.  You then drill a new hole at your location and at the opposite side, and remount it.

The student desiring to bring home the blue ribbon at the science fair will quickly realize that this simple project will answer the question of “how to convert a globe into a distance measuring instrument.”


Some links on this site are affiliate links, meaning this site earns a small commission if you make a purchase after clicking the link.

Science Fair Idea: “Lens” for Sound

1937MarPSFor students looking for a simple but impressive (and slightly dangerous) science fair experiment, this one from the March 1937 issue of Popular Science is almost certain to bring home the blue ribbon. It demonstrates that sound waves can be manipulated with a “lens” in the same way that light can. In this case, the “lens” is made up of a balloon filled with carbon dioxide. Since the CO2 is heavier than air, a bubble full of this gas refracts the sound waves. This can be shown, as hear, by using the “lens” to amplify a distant sound. To prove the effect, another balloon filled with normal air can be compared.  If the teacher requires that the project answer a question, then the question can be, “can sound waves be focused in the same way as light waves?”

To generate the carbon dioxide, the method suggested by the magazine is to place some limestone into a bottle containing muriatic acid.  The balloon is placed on the bottle and quickly inflates with the carbon dioxide produced by the reaction.

WARNING: Muriatic acid is another name for hydrochloric acid, and it’s very dangerous. You need to take precautions from getting it on your skin, and especially your eyes, since it could blind you. Do this part of the experiment outside, wear eye protection, and follow these other safety precautions. But you can get the muriatic acid at your local hardware store or on Amazon.  For children too young to handle the acid, a parent or teacher can produce the carbon dioxide and give the balloon to the child. The balloon full of CO2 is perfectly safe.


Some links on this site are affiliate links, meaning that this site earns a small commission if you make a purchase after clicking the link.

Anemometer With No Moving Parts

1957FebPE10If Junior wants to take home the blue ribbon at the next science fair, this project will almost certainly provide it. When Junior announces to the science teacher that he or she is going to build an anemometer (an instrument for measuring wind speed) with no moving parts, the teacher will be mystified, and will wonder whether it is even possible. But when they see the completed device in action, they will be astonished at its simplicity.

1957FebPE11The anemometer consists of a Wheatstone bridge circuit, which consists of four resistors. Two of the resistors are actually thermistors of equal value. As long as their resistance remains equal, the meter shows a reading of zero. But if they are unequal, then the meter displays a current. The two thermistors are placed outside at the spot where the wind is to be measured. When they are energized, they heat up slightly, which causes their resistance to change. As shown at left, both are mounted in a small plastic container, but one of those containers has small holes drilled in it. When it is exposed to the wind, it is cooled, but the other thermistor is not. The stronger the wind, the greater the cooling, and the current increases. In other words, as the wind increases, it is shown on the meter.

Once the meter is built, it needs to be calibrated, and that requires Junior to “enlist the services of a competent automobile driver” on a “highway which permits maximum state speed limits.” The driver accelerates to 60 MPH, and Junior holds the thermistor assembly out the window, as far as possible. (We note that Junior should take care not to have the arm amputated by a passing truck.) Junior then adjusts the instrument so that it indicates a full scale reading on the meter. The measurement is taken again at different speeds, and the meter reading is noted.

When Junior is awarded the blue ribbon for this elegantly simple design, the teacher will undoubtedly be thinking, “why didn’t I think of that?”

The original construction article, from the February 1957 issue of Popular Electronics, called for a “matched pair” of thermistors, since they need to have equal values. While it might not be possible to buy a matched pair, there is an inexpensive alternative. Junior can buy this set of 100 thermistors on Amazon at a very reasonable price. It includes 10 each of different values, including the needed 2kΩ. Junior just needs to measure all ten, and then use the two that are the closest in value. The remaining 98 thermistors can be used for other experiments. In fact, by adjusting the values of the other resistors, another value of thermistor could be used.

1957FebPE22


Some links on this site are affiliate links, meaning that this site earns a small commission if you make a purchase after clicking on the link.