Category Archives: Science fair ideas

Vinegar and Baking Soda Experiments: Beyond the Volcano

1951MarBL
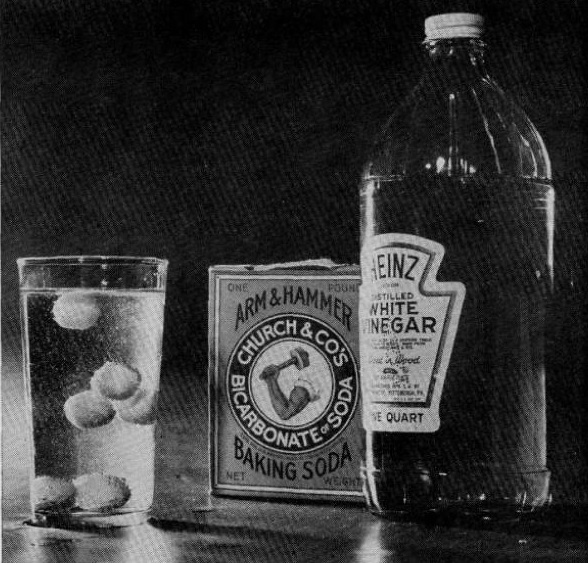
Every self-respecting young mad scientist probably discovered as a toddler that many hours of fun could be had by mixing vinegar and baking soda. When the time comes for their first science fair in elementary school, many of them harken back to this early experiment and decide to make a vinegar and baking soda volcano. In fact, if you Google the words “science fair vinegar and baking soda volcano“, you will get over a million results, many of which we are sure are fine educational projects. But we also know that our readers, even the youngest ones, strive for a bit more. So if your young mad scientist is thinking of a science fair project involving these venerable home chemicals, here are a couple of more advanced projects, which appeared in Boys’ Life magazine 70 years ago this month, March 1951. They are just as easy (or even easier) than the stereotypical volcano that other kids will be bringing, but they demonstrate some additional scientific principles.

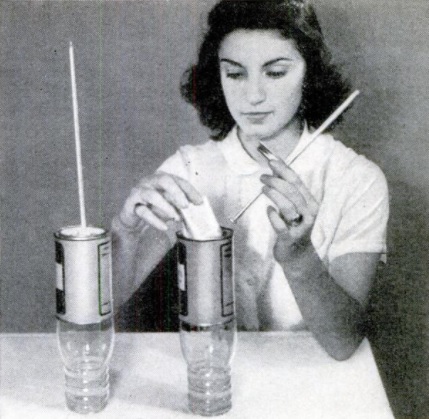
To do the experiment shown above, you start with a tall glass of water and add a tablespoon of vinegar. You then slowly stir in a half teaspoon of baking soda. Finally, you put four or five mothballs in the glass. They’re heavier than water and will sink to the bottom, but after about a minute, they will rise to the surface. They’ll sink again and continue rising and falling for hours.

What’s happening is that the mothballs are only slightly heavier than water. Little carbon dioxide bubbles affix themselves to the surface, which gives just enough buoyancy for them to rise. At the surface, the bubbles pop, and the mothball sinks again. If you don’t have any mothballs around the house, I’m told that raisins will work just as well.

1951MarBL2
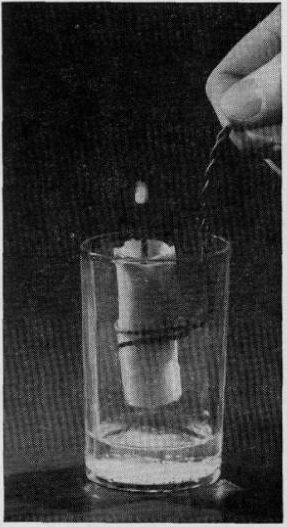
If Junior likes playing with fire (and what kid doesn’t?), they will enjoy the experiment shown at the left. You start with a teaspoon of baking soda at the bottom of an empty glass. To this, you add a tablespoon of vinegar diluted with a tablespoon of water. When the mixture begins to fizz, you lower a lighted candle into the glass. Since carbon dioxide is heavier than air, it fills the glass. And since carbon dioxide doesn’t support a flame (which is why fire extinguishers use it), the flame extinguishes itself.

But there’s more! If you act quickly enough, you can lift the candle back out as soon as it goes out, and the flame will miraculously come back to life. This is because there is still vaporized wax, and the wick is still hot enough to ignite as soon as it gets back into sufficient oxygen.

The kid who made the volcano will undoubtedly go home with a nice participation ribbon. But armed with these simple experiments proving scientific principles, Junior will undoubtedly take home the blue ribbon.


Parabolic Reflector Science Fair Project

1921MarSciInvIf Junior is looking for a science fair project involving acoustics, then this one from a hundred years ago will fit the bill. It’s simple to create but has a spectacular result. And as an added bonus, it promotes communication despite social distancing, since it is possible to whisper to someone about 20 feet away.

The diagram above is more or less self-explanatory. Two umbrellas are carefully placed on chairs as shown, and they serve as parabolic reflectors. The alignment is very critical, and it is recommended that a piece of string be used to keep the umbrellas exactly in line. In addition, each umbrella is thoroughly soaked in water, as this ensures that sound is completely reflected. While Junior whispers into one umbrella, the sound is heard by someone with their ear at the focus of the other umbrella. The sound seems to come from the closest umbrella.

The diagram and explanation appeared a hundred years ago this month in the March 1921 issue of Science and Invention.  The idea had been sent to the magazine by S. Leonard Bastin.

Some links are affiliate links, meaning that this site earns a small commission if you make a purchase after clicking on the link.


Science Fair Project: Tide Predicting Machine

1921MarPSA hundred years ago, this scientist is predicting the tides with the help of this tide predicting machine, described in the March 1921 issue of Popular Science.

The machine is an analog computer, one version of which was fittingly dubbed Old Brass Brains.  The first such machine was designed by Lord Kelvin, who noted that the tide at any particular location was the sum of a number of sinusoidal functions in the form:

A_{1}\cos(\omega _{1}t+\phi _{1})+A_{2}\cos(\omega _{2}t+\phi _{2})+A_{3}\cos(\omega _{3}t+\phi _{3})+\ldots

Prior to the advent of the digital computer, such a computation would be laborious, especially if one needed to repeat it to calculate the tide minute by minute. But with the analog computer, once the various constants were set, it was simply a matter of turning a crank and seeing what the tide was at any given time.

Each term of this equation is represented in the machine by a wheel similar to the one shown at the left.  As the wheel turns, the piece in the middle moves up and down, and the distance moved up or down is proportional to the cosine of the angle at which the wheel is turned.  By changing the position of the pin and the size of the wheel, the various constants in the equation are taken into account.  The output of this wheel is then linked by a pulley to the next wheel.

Replicating such a machine in its entirety would, of course, cost millions of dollars in precision machining.  However, the advanced student could create a very impressive science fair project by constructing a part of such a machine, namely one of these wheels, or perhaps even link two wheels together.  With information from the WIkipedia articles and Popular Science article linked here, a very impressive exhibit could be created.


Icebox Experiment: 1941

1941MarPSEighty years ago, this young woman was conducting a scientific experiment to determine the best way to maintain ice in an icebox. In 1941, not everyone had a refrigerator. The icebox was still common. It was nothing more than in insulated box in which ice, usually delivered by the iceman, was placed to keep the food cold.

You had to pay for the ice, so the natural tendency of the frugal housewife would be to wrap up the ice in a towel to make it last longer. This experiment showed that this was false economy. As Popular Science, March 1941, puts it, by saving the ice, you’re spoiling the food.

To prove this, she made prepared two identical cans, making one hole at the top and one hold at the bottom of each. The bottom hole was for drainage, and the top hole was for a thermometer. Into each can was placed an ice cube. One was wrapped in paper and the other was bare.

When a thermometer was placed in each, the one with the unwrapped ice would be colder, although the ice would last longer.

The modern student could replicate this experiment quite nicely. Even though we no longer use ice boxes in the home, the experiment demonstrates the best procedure for use in a travel cooler.  In addition to measuring the temperature inside the can, the student could compare the length of time the ice lasted.


Science Fair Idea: Home Energy Efficiency

Here’s an idea for students looking for an interesting science fair project, or for those who are simply nosy and want to see if their neighbors are wasting energy.

For those of us who live in cold climates, it’s easy to keep track of how much energy your neighbors are using for heating. For any house with a conventional gas, oil, or coal furnace, there’s an easy indicator telling you exactly when their furnace is running. There’s a vent on the roof of the house, and when the furnace is running, you can see steam rising from it. When the furnace is turned off, the steam quickly disappears. (The water vapor might not be visible when the temperature is high enough, but on cold days, the effect is readily apparent.)

Furnace is on.

Furnace is on.

This means that just by looking at a house, you can tell if the furnace is on. By keeping an eye on it for a few hours, you can determine what percentage of the time the furnace is running. Families who are conserving energy by turning down the thermostat a few degrees, or those who have well insulated houses, will have the furnace on fewer minutes per hour, saving money and energy.

For a science fair project, the student is usually expected to design an experiment that answers a question. The easiest question would be, “how does temperature affect fuel consumption.” By monitoring on different days with different temperatures, you can make a chart showing that when the temperature goes down, the amount of time the furnace runs, and hence the amount of fuel burned, goes up. Or you could compare different houses, and answer the question of whether a _____ house uses more energy than a ____ house. You can fill in the blanks as you please.

Furnace is off.

Furnace is off.

Since numerous chimneys are probably visible from your house, you can conduct the entire experiment from the comfort of your own home.


Transformer Science Project


1946FebBL75 years ago, this young man discovered the secret for meeting girls. That, of course, was explaining to them how transformers worked. This young woman is obviously mesmerized by his explanation.

He gained this skill by conducting the experiment shown below. He constructed his own transformer with two coils of wire wound around an iron core. To provide the alternating current, he runs one wire along the file.

1946FebBL2

These items appeared as part of an for Westinghouse in the February, 1946, issue of Boys’ Life.  It reminded readers to tune in to programs sponsored by the company, John Charles Thomas and Ted Malone.

The science project is easily duplicated today.  While the old-style dry cell battery is no longer available, an alkaline D cell, with suitable holder, would work just fine.  The other items needed are wire, the bulb (with socket to make the connections easier), an iron bar, and file.


Science Fair Ideas: Measuring the Moon’s Diameter

1941FebPSIf Junior is looking for a science project that can be completed in one evening, the teacher will be suitably impressed when Junior announces that he will measure the diameter of the Moon. All that’s required is a window through which the moon is visible and a couple of pieces of tape. Masking tape would probably work the best, but you could also use a couple of Post-It notes. You’ll also need a card through which you cut a hole.

Place the strips of tape on the window 1-1/4 inches apart. Then, you move the card away from the window, and keep looking through it until the moon appears to fill the space between the two pieces of tape. Measure the distance between the card and the window. At this point, the proportion of the two distances is the same as the proportion between the moon’s diameter and the distance between the moon and the earth.

Let’s say, for example, that Junior measures the distance between the card and the window as 137-1/2 inches. (Ahem, and if he does the experiment correctly, that’s the number he should get, assuming that the moon hasn’t changed size.)

According to NASA, who has been there, the moon is 238,855 miles from the earth. So we have a ratio:

1.25 / 137.5  =  X / 238,855

If Junior’s algebra is a little bit rusty, he can use this online calculator to get the answer of 2171.4 miles. According to space.com, the actual diameter is 2159.2 miles, so we would say that Junior’s method is pretty close.

1941FebPS2The experiment appeared 80 years ago this month in the February 1941 issue of Popular Science, which also carried some other astronomy experiments and demonstrations. For example, shown here is a demonstration of a solar eclipse, using a lamp for the sun and a tennis ball for the moon. One of these would be an excellent project in preparation for the June 10, 2021 annular eclipse or the April 8, 2024, total solar eclipse, both of which will be visible in North America. The magazine even shows how to demonstrate the orbit of a comet using an electromagnet to simulate the sun’s gravitational pull on a steel ball simulating the comet.


Light Bulb Illusion

1946FebPSWe would be hard pressed to come up with any scientific principle that is established by this demonstration, but it’s a clever illusion, and if Junior’s teacher is the charitable sort, we’re sure that this project would be a most welcome diversion at the next science fair.

The light bulb seemingly glows without being hooked up to anything. As you can see from the diagram, this is accomplished by taking the base from a burnt out bulb and carefully attaching it to another bulb.

The idea appeared 75 years ago this month in the February, 1946, issue of Popular Science.


Science Fair Idea: Barkhausen Effect

1941JanRadioTV2The young scientist wishing to create a simple but spectacular science fair project is almost assured of taking home the blue ribbon by duplicating the 1919 experiment of German scientist Heinrich Barkhausen establishing the domain theory of magnetism. When a piece of ferrous material is magnetized, it does not magnetize evenly. Instead, tiny pieces of material are magnetized together in discrete pieces. This is known as the Barkhausen effect.

Stamp Heinrich Barkhausen.jpg

Barkhausen on 1981 East German stamp. Wikipedia image.

To prove this, a coil is wrapped around a piece of iron, and the coil is connected to the input of an audio amplifier. As a magnet is brought toward the coil, static is heard in the speaker. But if the iron core is removed and the experiment repeated, the static is absent. A simulation of the effect can be found at this link.

Replica of Barkhausen’s experiment. Wikipedia photo.

Full instructions can be found in the January 1941 issue of Radio & Television magazine. You will need 38 gauge or smaller enamel wire to wind the coil, as well as an audio amplifier and speaker.


Since Fair Project: Ferroresonance

1961JanPEIf Junior is looking for a science fair project, the teacher probably wants the students to create an experiment to answer some question. Often, the student is required to submit the question for approval. If the teacher deems the question to be appropriate, then the students are allowed to proceed with the experiment.

Occasionally, teachers have been known to be nitpicky with this process, rejecting questions based upon their personal perception of scientific merit. Therefore, there might be some advantage to proposing a question that the teacher doesn’t understand. Then, they can’t reject the question without revealing their own scientific ignorance.

We can guarantee that Junior’s teacher has never heard of ferroresonance. Therefore, if Junior proposes a project involving ferroresonance, then the teacher is bound to accept. Junior’s question could be something along the lines of: “Can non-linear inductance be used to make a ferroresonant relaxation oscillator?” It turns out that the answer is yes, according to the January 1961 issue of Popular Electronics, and it can be proven by the experiment shown here.

Ferroresonance was first described in 1907 by French electrical engineer Joseph Bethenod, and named by French engineer Paul Boucherot.

A circuit is resonant when the capacitive reactance and inductive reactance are equal. And normally, the reactance is dependent upon the frequency alone. But other factors, such as magnetic flux of the inductor, can cause non-linear effects at the time when the circuit is initially switched on.

The heart of this experiment is an old choke of more than 1 Henry, capable of handling at least 50 mA. I’m guessing that one could use an old power transformer. Remove the frame to reveal the “E” shaped core inside. From another old transformer, obtain a section of laminations, which will be laid on the top.

According to the magazine, “the point of adjustment is quite critical and requires a bit of patience.” The loose section starts completely on top of the “E”. With the switch on, the bulb should not light. That section is slowly moved, about 1/32 of an inch at a time, with the switch turned off after each move. At the critical point, the bulb will flash on and off at intervals of about 1 second.

Junior will thus have demonstrated that by varying the magnetic flux, he has introduced a non-linearity which causes the circuit to flash.

It should be noted that this experiment involves 120 volt electrical current, so proper precautions should be taken.