Category Archives: Science fair ideas

Science Fair Project: AC Ammeter

1939OctPSLast month, we showed how Junior can win the science fair blue ribbon by making a hot-wire ammeter. That device, however, required a bit of precise construction, and the idea might not work if he hasn’t started yet and the project is due tomorrow.

Today, however, we have a project that can be put together in one evening, using parts that can be found around the house, or from the local hardware store. While not as precise, this meter also measures AC current. Today’s project is from 80 years ago, from the October 1939 issue of Popular Science.

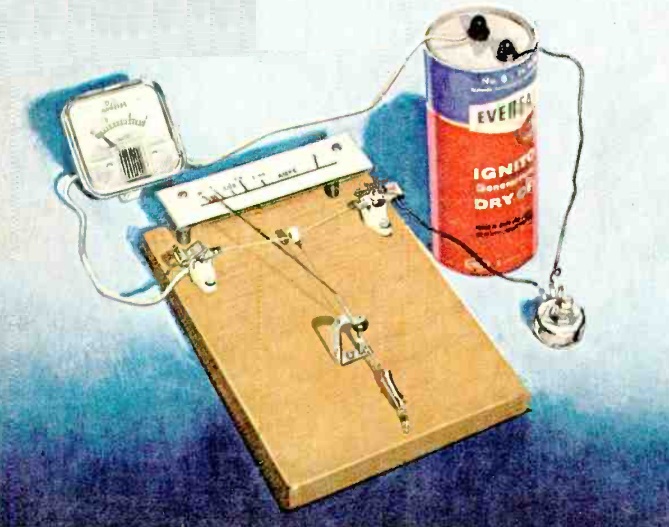
The meter consists of nothing more than several turns of wire around a cardboard tube.  A piece of toilet paper tube will work well.  Like most old projects, the instructions call for bell wire, since this was readily available back in the day.  However, any type of insulated wire will work.  Because relatively high currents will be used, it should be a fairly thick gauge.  I would recommend buying a cheap extension cord, cutting off both ends, and then “unzipping” the two wires.

To make the project a bit safer, I would use another cheap extension cord cut in half.  The plug end  can be plugged in to an outlet strip and turned on when it’s time for the experiment.  This would allow you to cover all exposed wires with electrical tape.

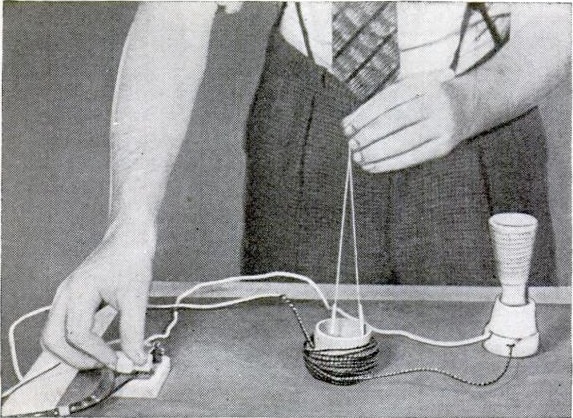
After cutting this extension cord in half, splice one set of wires back together.  The remaining set of wires are connected to the coil.  The plug end goes to one terminal of the coil, and the socket end goes to the other side of the coil.  Into the socket, plug in an electric heater, which draws a large current.

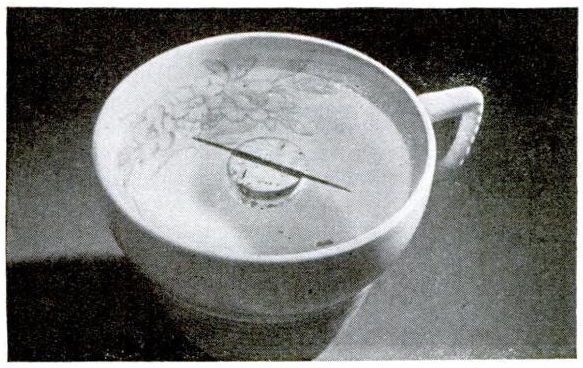
Plug this in to the outlet strip and turn it on.  The heater should be running, and all of the current is passing through the coil.  Then, lower two iron or steel nails or screws on a string into the center of the coil.  Since they are magnetized with the same polarity, they will repel one another.  The higher the current, the further apart they are repelled.  You can demonstrate this by switching the heater from high to low.

It should be noted that today’s project involves household current, and care must be taken not to touch any exposed wires, since contact could prove fatal.


Science Fair Project: Hot Wire Ammeter

1969AugSepRadioTVExpThe young scientist looking for an award-winning science fair project can’t go wrong with this ammeter from the August-September 1969 issue of Radio-TV Experimenter.

The instrument can be constructed with materials from the hardware store, but will do accurate measurements of current, whether it is DC, AC, or even RF. It is a hot-wire ammeter, and was frequently used in the early days of radio for measuring RF current in order to calculate power. As the name implies, the current is measured by the expansion and contraction of a steel wire. As the current flows, the wire heats up. It is attached to a spring-loaded second wire, and that wire moves a pointer. A standard ammeter can be used to calibrate the device once constructed. In the photo here, the meter is shown measuring current from a dry cell battery (and a modern alkaline D cell will work just as well as the old-fashioned battery, especially when used with a battery holder). However, the instrument can also be used to measure AC current, and can be used as part of an experiment measuring current consumption of various kinds of light bulbs.


Science Fair Ideas: Earth’s Magnetic Field

1944AugPScompassSeventy-five years ago this month, the August 1944 issue of Popular Science showed a number of simple science experiments relating to the Earth’s magnetic field. For students looking for a simple science fair experiment, these will prove most adequate. The two shown on this page answer the question, “does the Earth have a magnetic field?” It turns out that yes, yes it does.

Magnetizing the needle.

Magnetizing the needle.

The first experiment produces the compass shown above that is, as the magazine puts it, as good as the best that was known for centuries. All you need is a sewing needle, a magnet, a cork, and a cup or glass (non-metallic) of water. You magnetize the needle by stroking it over the south pole of the magnet, starting at the eye and ending at the point.

If you get that mixed up, it doesn’t really matter, as one end will point north, although it might not be the pointy end. Either way, you’ve proven that the Earth has a magnetic field.

1944AugPSironrodThe other experiment, shown at left, uses the Earth’s magnetic field to magnetize an iron rod. You hold it so that it’s pointing north, and to maximize the magnetic field, you angle it down toward the ground. Tap the upper end with a hammer, and the atoms will align with the magnetic field. You can test this by bringing an end near a compass, either the one you made yourself, or one you bought.

You probably have most of the supplies you need for these experiments around the house, or they are available locally.  The links above are to Amazon.  The links are affiliate links, meaning that this site receives a small commission if you order after clicking on them.


Science Project: Conductivity of an Electrolyte

1939AugPSIf you’re looking for an interesting science fair project, this one from the August 1939 issue of Popular Science is interesting, looks like you put a lot of work into it, but is really quite simple. It answers the scientific question, “does the temperature of an electrolyte solution affect the conductivity?” It turns out, as this experiment will show, that the answer is yes. As the temperature increases, so does the conductivity.  (Or to put it another way, as the temperature goes up, the resistance goes down.)

The experiment, as shown above, is relatively simple.  You should be able to find all of the required supplies locally (if you don’t already have them at home).  If you want to order online, the links below are to Amazon.

The 1939 version of the experiment shows old fashioned dry cell batteries, but modern alkaline D cell batteries will work just fine.  You can figure out some other way to attach the wires to the batteries, but life is a lot easier if you use a battery holder.

Any flashlight bulb will work, as long as it’s from a flashlight that normally uses 2 batteries.  This one is suitable.  Again, you can figure out some other way to connect the wires, but having a socket will make things easier.  Finally, for the electric hookups, you will need some kind of wire, although almost any will work just fine.

The two electrodes going into the solution can be almost anything metallic.  I would recommend using some large nails.

You’ll need a beaker and some lab hardware to support it while heating, although if you should be able to borrow that from your science teacher.  If you’re doing the experiment in the school lab, you can use a bunsen burner.  If you’re doing it elsewhere, you’ll need a heat source such as an alcohol burner.

The experiment calls for either salt water or sulfuric acid.  You surely have salt at home.  If you prefer to go with sulfuric acid, you can order that online, or ask for it in the hardware store, where it’s available as a drain cleaner.


Science Fair Project: Viscosity

1939JunePSIf Junior’s science fair project is due tomorrow and he hasn’t even started, then this project is just what he needs to turn the emergency into an A+ project. You probably have everything you need around the house. If you can’t find a couple of odds and ends, you should be able to find them at the trusty dollar store.

The exact layout of the experiment is not critical.  You need two cans of similar shape and size, which you should be able to find in the recycling bin.  You’ll also need some wire or string–almost any type will do.  You’ll need something to hang them from.  In this example, the experimenter is using some kind of stand.  But a chair or table will work just fine–you just need the two cans to be able to hang freely.

Finally, you’ll need some water (H2O) and some sand.  If you can’t find any sand, any solid will work, such as dirt, sugar, salt, etc.  You just need something to add weight to the can.

The experiment demonstrates viscosity–the “thickness” of a fluid.  After setting up the two cans, you twist each of them an equal number of times, for example, 5 times, and then let go.  The can with sand will keep rotating a much longer time.  After unwinding 5 times, it will wind itself in the other direction almost 5 times before again reversing.  The process will continue for a long time.

The can with water will settle down much faster.  This is because the water’s low viscosity means that most of the water is not turning.  Only the light can is spinning, and it will lack the momentum to continue as long as the can full of sand.

If Junior wants to be ambitious, he can use other thick liquids.

The teacher will want the experiment to answer a question.  There are many possibilities.  For example, he can use the question, “how does viscosity affect the rotation of a spinning container.”  Or, he can pick two liquids and answer the question, “which has a higher viscosity–water or cooking oil.”  The one that spins the longest has the higher viscosity.

The project originally appeared 80 years ago this month in the June 1939 issue of Popular Science.


How to Cut Glass with Scissors

1919MayPS3A hundred years ago this month, the May 1919 issue of Popular Science showed how to cut glass with a pair of scissors. Lo and behold, it is possible, as long as the glass is submerged under water.

The article noted that it is often necessary to cut an odd-shaped piece of glass, such as to replace the broken glass on an electrical instrument. According to the magazine, “ordinary window-glass may be cut to almost any desired shape by holding it beneath the surface of a pan of water and cutting with house shears.”

A straight cut was not possible, but it was possible to “chew out” the piece. Of course, my first reaction was that if this was indeed possible, then there would be YouTube videos, and indeed there were, such as this one, which inexplicably tells you not to try it at home. I encourage you to try it at home, but the recommendation to use eye protection is a good one.

According to this website, an unnamed issue of Scientific American explains the phenomenon by saying that water causes glass to crack more easily when water enters the crack. The “silicon-oxygen bond at the crack and an oxygen-hydrogen bond in the water are cleaved, creating two hydroxyl groups attached to silicon. As a result, the length of the crack grows by the size of one bond rupture. The water reaction reduces the energy necessary to break the silicon-oxygen bonds, thus the crack grows faster.”

How well does it work? That question would be suitable for some young scientist to explore as part of a winning science fair project.


Science Fair Idea: Does a Flame Conduct Electricity?

1939MayPSIf Junior’s science fair project is due tomorrow, there’s still time to whip together a meaningful project, and this one from the May 1939 issue of Popular Science should fill the bill. You probably have all of the necessary parts at home. If you don’t, you should be able to find them at the trusty dollar store.

This experiment answers the question, “does a flame conduct electricity?” It turns out that it does, and this experiment proves it. All Junior needs (in addition to the obligatory poster board and magic markers) is a battery (a 9-volt battery should work fine), a pair of headphones (a cheap pair of stereo earbuds will do the trick), a few short pieces of wire, and a candle.  And, of course, don’t forget to give Junior some matches or a lighter!

One terminal of the battery is hooked to the headphones. The other terminal of the battery and the other terminal of the headphones are each hooked to a piece of wire. Remove the insulation for the other end of those two wires. When Junior sticks the two wires into the flame of the candle, a clicking will be heard in the headphones, confirming that electrical current is flowing.

If Junior has more time to prepare his entry, he might want to consider more complex versions, such as the flame audion or the flame speaker.

1939MayPS2If you don’t trust Junior with matches, then the same magazine also shows the experiment shown here.  Junior will need a piece of glass, an iron, a lamp (with an old-fashioned incandescent light bulb) and a thermometer.  The glass will effectively block the heat from the iron.  The radiant heat from the lamp, however, has a shorter wavelength and will pass through the glass.  So when the iron is used, the thermometer won’t budge.  But with the lamp, the temperature will rise quickly.


Homemade Hygrometer (Humidity Meter)

1944AprPSHygrometerFor the student looking to put together a classic science fair project from the past, this hygrometer from the April 1944 issue of Popular Science should fit the bill.  A hygrometer is simply a device to measure humidity, and this one uses a single human hair as the sensor, just like the first one constructed by Horace Bénédict de Saussur in 1783.

Construction will require a bit of trial and error, but is quite simple.  First, a strand of hair about four inches long is washed “in cleaning fluid.” Another set of plans available on the internet recommend the use of dilluted rubbing alcohol, which should probably work as the cleaning fluid. The idea is to remove the oil from the hair to make it more sensitive to changes in humidity.

One end of the hair is attached to a fixed point, and the other end is wound around a large-eyed sewing needle. The 1944 article recommends attaching it to the needle with sealing wax.  However, you should be able to use other fancy stuff, such as hot glue or possibly just regular glue.

The needle is held in place by bearings consisting of shirt buttons. Finally, a pointer is attached to the needle. As the humidity changes, the hair expands and contracts, which causes the needle to rotate. The amount of rotation is visible on the pointer.


How to Make an Electret

1969MarPEelectret2

1969MarPEelectret1If you’re looking for a really dangerous science experiment, then you need look no further than the March 1969 issue of Popular Electronics. The magazine describes the electret. It points out that it is the analogue of a permanent magnet. Instead of producing a permanent magnetic field, the electret produces a permanent static electric field. For example, it’s possible to make an electret, and then use it to produce a spark weeks, months, or even years later.  The name electret was coined by Oliver Heaviside in 1885 as a combination of electr- from electricity, and -et from magnet.

The process to create an electret is quite simple. You simply take a suitable material (in this case, a piece of lucite), heat it to a high temperature, and then let it cool while applying a high voltage.  That sounds easy enough, but the voltage must be very high.  The article suggests 14,000 volts, and tells you exactly where you can get it–from the family’s portable TV set.

You simply remove the anode clip from the picture tube, and that’s your source of high voltage.  But as the article rightly points out, messing around with 14,000 volts could easily prove fatal if you make the smallest mistake.  So we don’t recommend this particular experiment.  Old TV sets had an interlock for a reason, and that was to prevent them from operating when the case was open.  In fact, as the article points out, the wire in question could easily deliver a deadly jolt even with the set unplugged and turned off.  This is because the capacitors in the power supply retain a charge.  In other words, you probably shouldn’t attempt to duplicate this experiment unless you are very familiar with exactly what the dangers are.

But the procedure itself is quite simple.  You build an oven a shown here, and use Sterno to heat it.  When you reach the desired temperature, you carefully wire up the high voltage.  While standing back many feet, you plug in the TV.  If you hear strange noises, then you unplug the TV.  Prior to making the connection, and after you unplug the set, you need to discharge the TV’s power supply capacitor.  The article recommends an electrician’s glove.

After the lucite is fully cooled, you disconnect things, and you have yourself an electret.

Of course, modern televisions don’t have CRT’s, so they don’t have 14,000 volt power supplies inside.  So if you’re intent on duplicating this experiment, you’ll need to find an old TV, the older the better.  Even though we have this experiment in the “science fair ideas” category, we don’t recommend it to students due to the lethal voltages involved.  But we have many other experiments that you can find by browsing that category.


Science Fair Idea: Plants Give Off Oxygen

1939MarPSMany of our science fair ideas are geared toward the student prone to procrastination. If you look through our site, you’ll find many projects that look spectacular but can be whipped up in a single evening. This one doesn’t come under that category, since it requires several days of being set aside. But still, it establishes some meaningful science and has the added advantage of including something bursting into flame.

To show that plants put out oxygen, the experiment collects some of the gas emitted by a plant. After enough has been collected, the student can establish that it’s pure oxygen by placing a small smoldering piece of wood or paper into it, where it will burst into flame.

This idea appeared in Popular Science 80 years ago this month, March 1939.