 Bottom Line: This little rig is an exceptional value, but it does have lots of idiosyncrasies.
As I mentioned previously, I recently acquired a zBitX transceiver from HFSignals.com. It’s made in India, and you can have one for $200, which includes shipping.
The company is based in India, although they seem to be incorporated in Delaware, USA. This little radio is popular, and there is a waiting list. In my case, it took about four weeks to ship after my order. Once it was shipped, it took less than a week to get here via DHL. (Mine is number 4017.)
The radio is an exceptional value for the money, although it’s probably not a good choice for your first radio or only radio. But even a few years ago, I never would have dreamed that I could have a complete HF station that fits in my pocket (albeit a rather large pocket). It covers 80-10 meters, and will work CW, SSB, AM, FT8, and other digital modes. What I find remarkable is that you can make FT8 contacts without any external hardware.
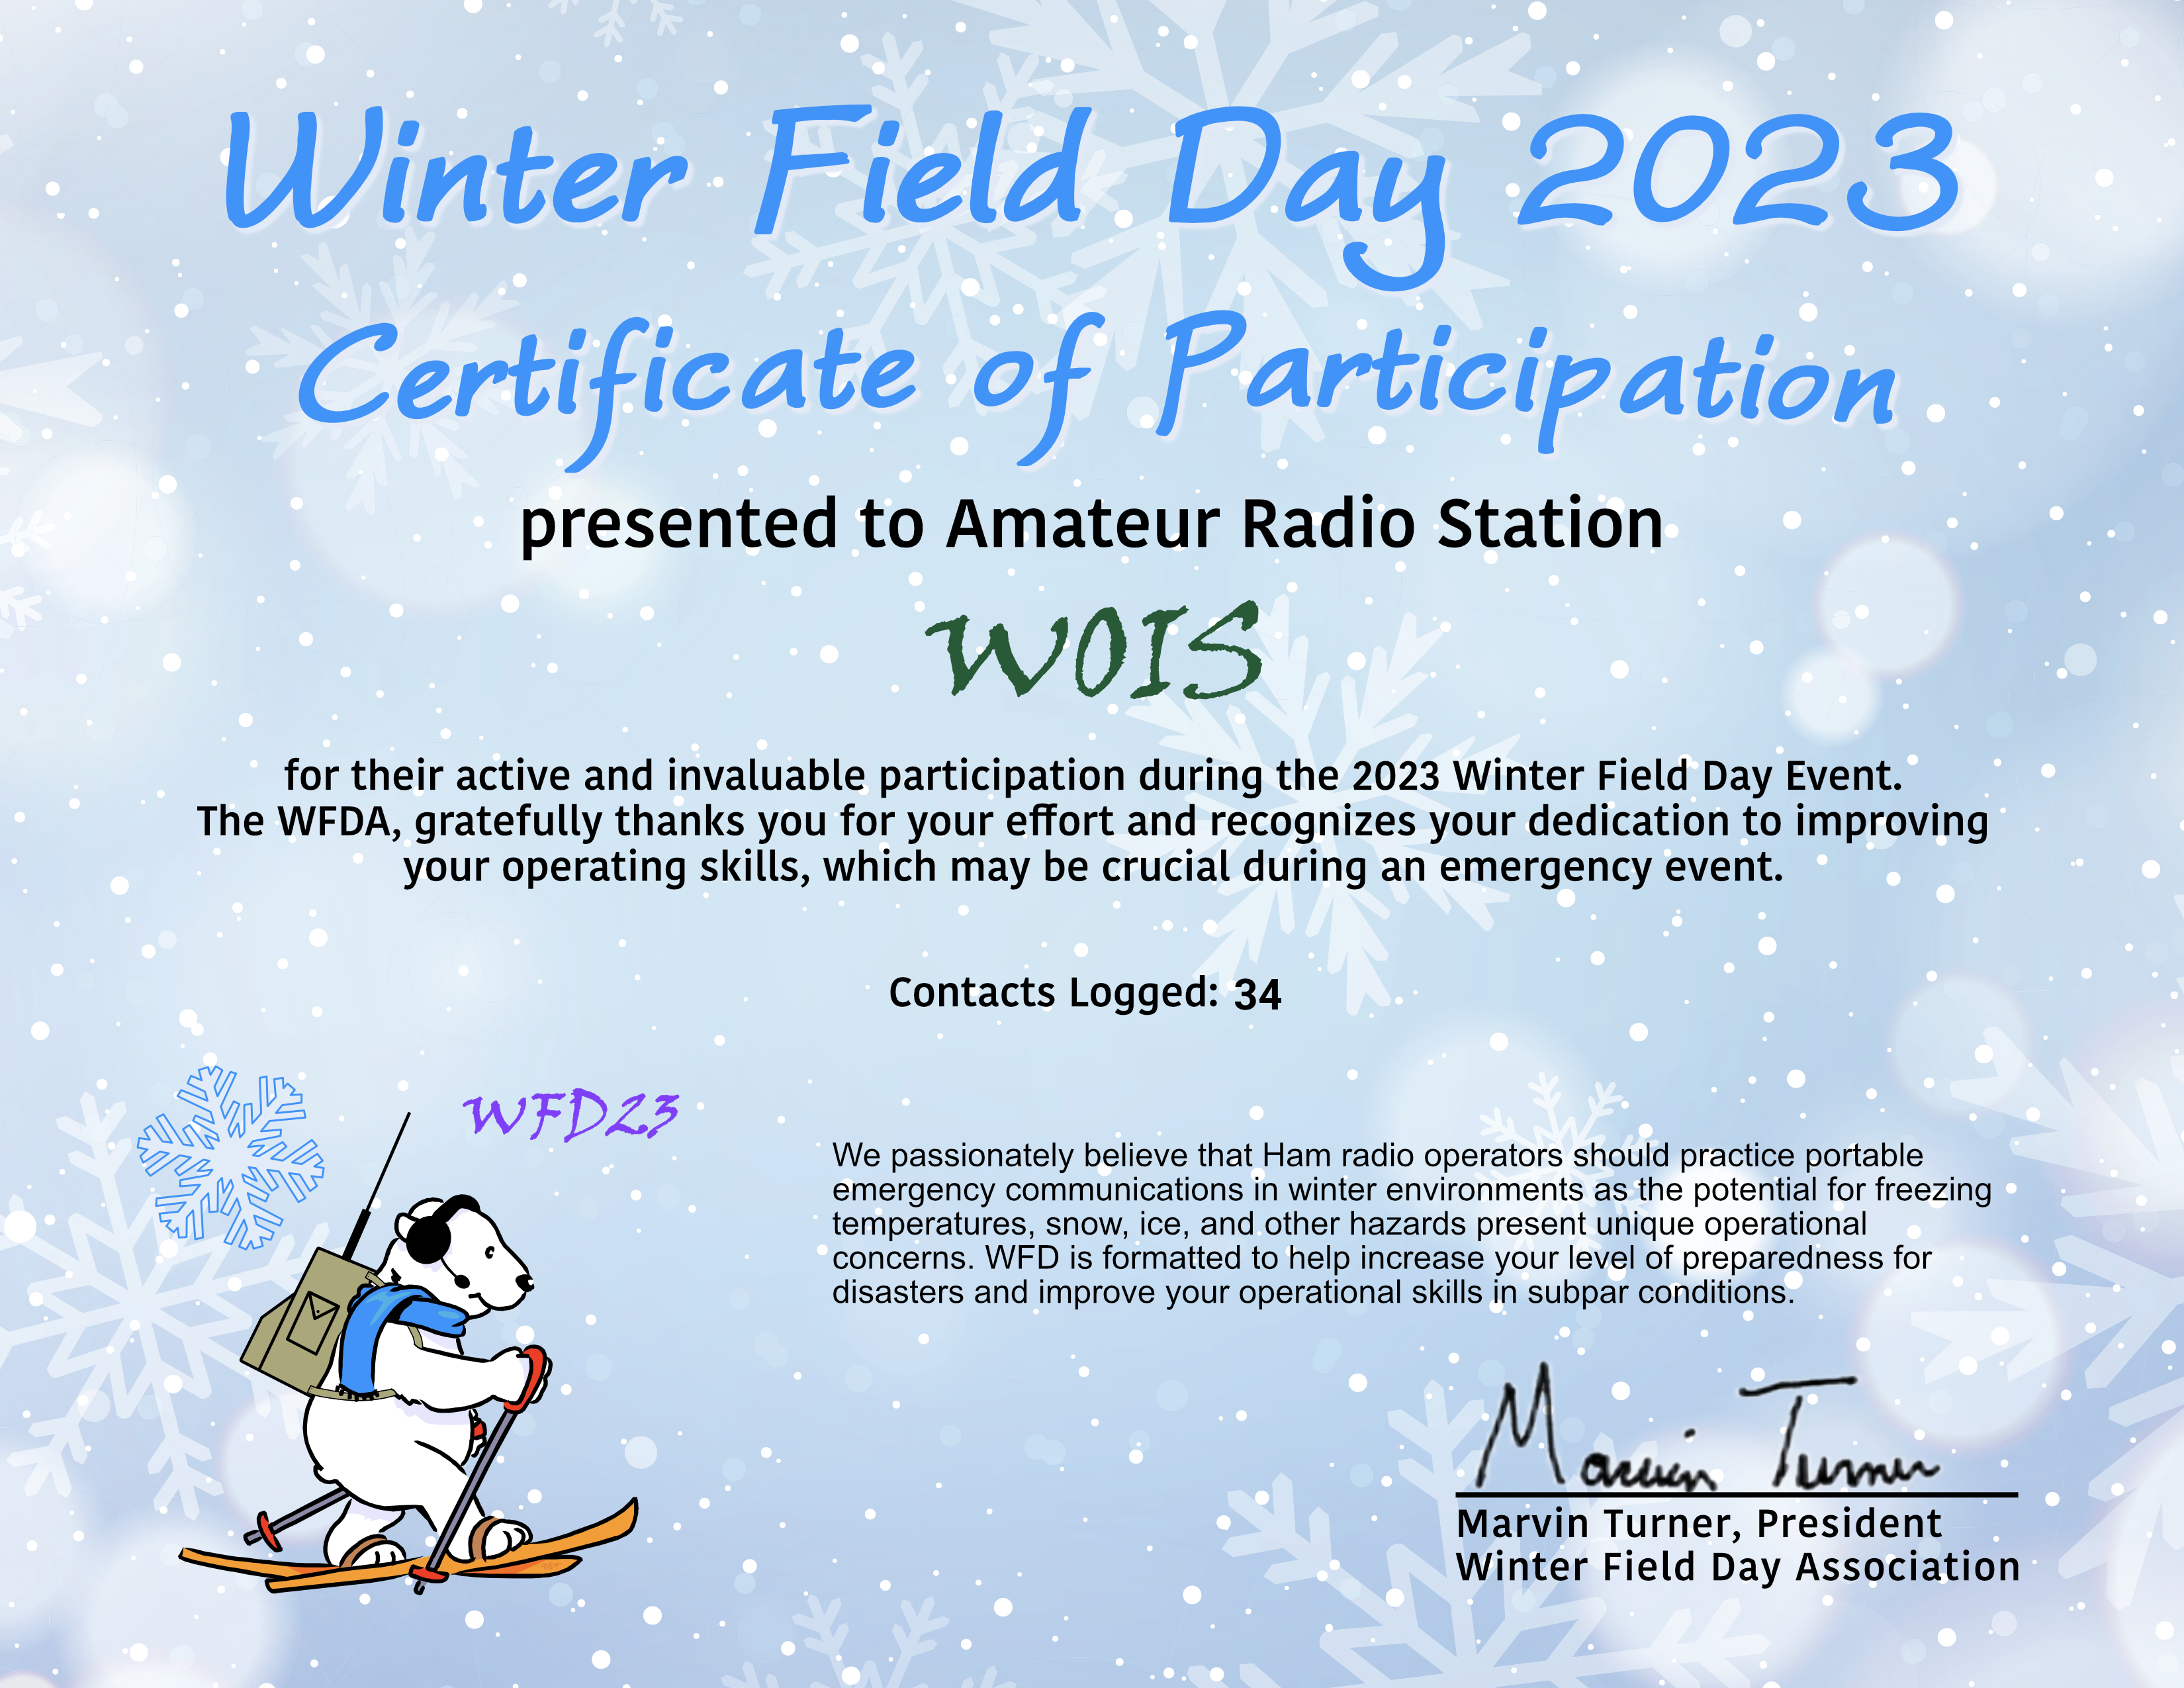
It’s perfect for activities such as Parks On The Air (POTA). The image above is from Field Day, where over the course of about 2 hours, I worked about 20 contacts, most on CW, but one on SSB. (I could have worked a lot more on CW if I hadn’t spent unfruitful time trying FT8). As with most QRP activities, CW gets through a lot better than SSB. If you’re planning on working SSB QRP (particularly when conditions aren’t great), it can be an exercise in frustration. But the radio works on SSB, with the built-in microphone, and I’ve made two contacts, one on Field Day, and another during the West Virginia QSO Party.
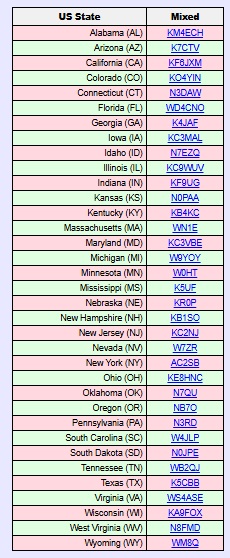
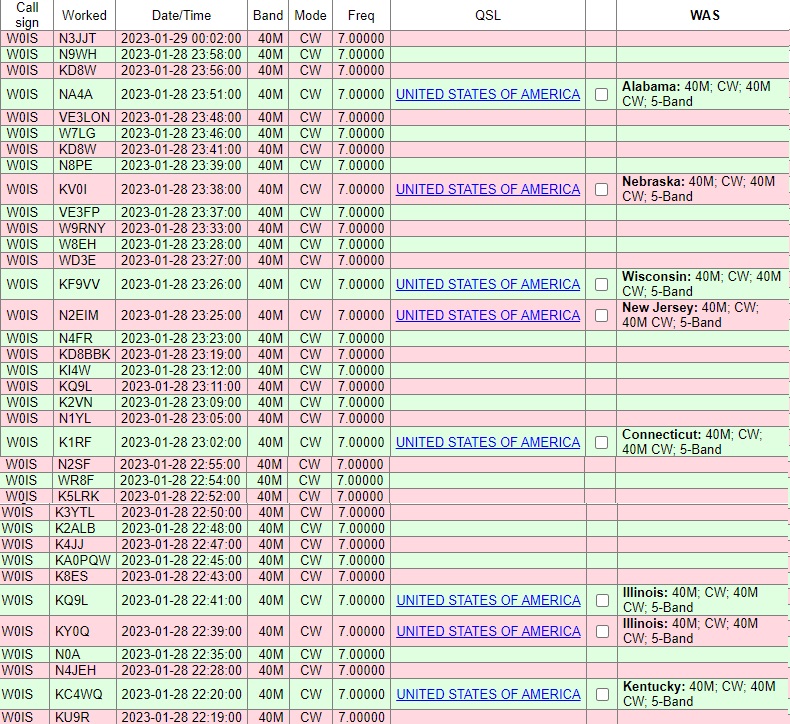
 Within about three weeks, I worked 35 states, and my best confirmed DX is Italy. I’ve used it mostly on FT8 and CW, although I have made those two SSB contacts (from Minnesota to West Virginia and New Hampshire). I don’t have an external microphone, so I just talk into the radio. The built-in microphone is at the upper left corner of the radio.
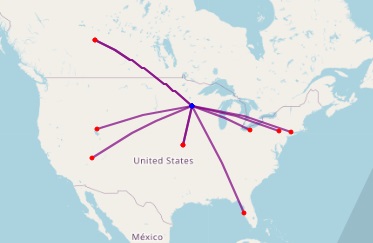
On the left is a list of states that I have confirmed so far, and at the right is a typical display from PSK Reporter showing where my signal was being picked up from my home.
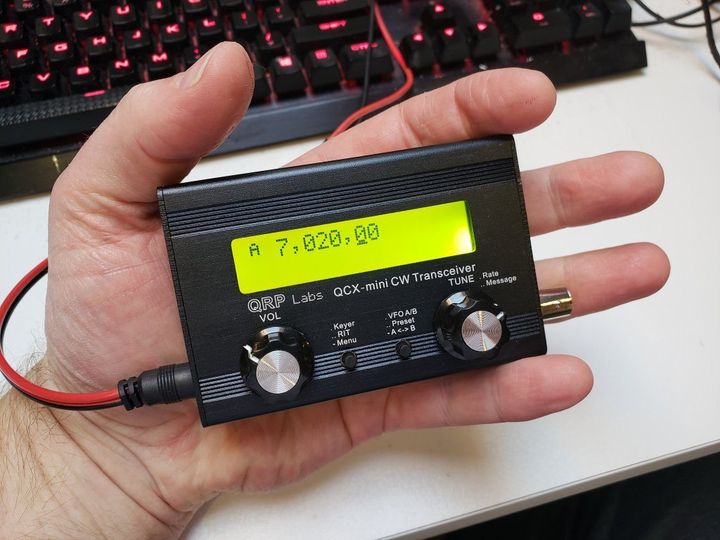
The radio has only one knob, along with a touchscreen. It came with a fine-point stylus, which is extremely useful. You can use the type of stylus that you might normally use with your phone, although the fine point is helpful. Theoretically, it would work with your fingers, but that would be extremely difficult, given the small size of the screen and the large size of most hams’ fingers.
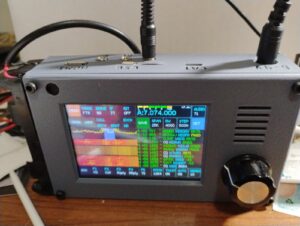
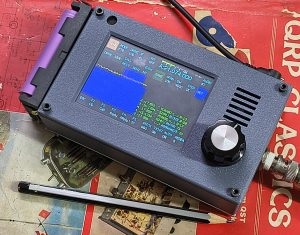
zBitX in operation at W0IS.
Basically, you tap on the portion of the screen you want to change, and then use the knob to change it. So if you want to change frequency, you tap on the frequency, and start spinning the knob. It does take a little getting used to. For example, before turning the knob, you might need to adjust the steps, which can be from 10 Hz to 10 kHz. So to quickly change frequency, you can set the stop to 10 kHz, and quickly go from one end of the band to the other. The most convenient setting overall is 500 Hz. To change the step, you click on that field, and then use the knob. But you need to remember to click again on the frequency display. So many times, I change the step, but forget to tap the frequency. So when I spin the knob, only the step changes.
General Coverage Receiver
The receiver covers 500 kHz to 30 MHz, and as far as I can tell, it will transmit wherever it receives. So you do need to be careful to stay inside the band. The limited testing I’ve done shown that it performs reasonably well as a receiver, so if you need to listen to the AM radio, the shortwave broadcast bands, or WWV, it will be adequate, although probably not a stellar performer. But one catch is that changing frequency can take a lot of time.
For example, if you want to listen to the AM broadcast band, you need to tune to the closest ham band, 80 meters. Then, you need to set the tuning step to 10 kHz, and start spinning the dial to get from 3500 kHz down to the top of the AM band at 1700 kHz. But you probably didn’t buy the radio to listen to AM, so that shouldn’t be a major concern.
Lack of Power Switch
One quirk about the radio is that it doesn’t have any kind of power switch. To turn it off, you simply pull the power plug. That isn’t a concern for a radio, but the computer purists out there will note that it’s not a good idea to simply cut the power to a computer. And the zBitX is mostly a computer (a Raspberry Pi) with enough additional components to make it send and receive radio waves. So it’s probably not the greatest way of doing things, but it seems to work. Every time I’ve plugged the power back in, it comes back to life (after almost a minute of booting up). When powered off, the radio maintains memory of the logbook, as well as your call, grid square, and settings. On one occasion, my call sign and grid disappeared when I powered the radio back up. I assume this is the result of the power-off sequence (or the lack of one). But other than that, I haven’t experienced any problems.
Power Supply
 The radio comes with a built-in battery holder on the side designed to hold two 18650 Li-ion batteries. I ordered this four pack, which includes a charger, placing the order before the radio came. It turns out 18650 batteries come in two forms: a “flat-top” and a “button-top.” The button-top looks kind of like a AA cell, in that the positive end has a little bump. the flat-top is flat on both sides. It turns out that, had I read the instructions, the flat-top was called for, and I ordered the wrong ones. However, the button-tops worked just fine, although it’s a bit of a tight fit.
The button-top actually has an advantage, since it’s obvious which side is positive. One thing you never want to do on this rig is hook the power supply up backwards. Apparently, there’s a diode in the circuit to protect against this. But there’s no fuse, so a trace on the circuit board leading to that diode is what would get fried. The takeaway is that you never, never, want to get the polarity wrong! When you’re putting in batteries, check and double check.
In retrospect, I’m not sure if I would have bought these batteries. They last for about one hour of normal operation. Not only are you running the transmitter, but the internal computer is powered up the full time. Having built-in batteries is somewhat satisfying, since you have essentially a handie-talkie for 80 through 10 meters. But it’s much more practical to run the radio from an external power supply. In my case, I use my lead-acid fish finder battery, which allows operation for longer than I ever need it. But the radio does not operate directly off 12 volts. Instead, it’s set up for 6-9 volts. Apparently, it will work with 12 volts, but it’s not advised, because it will stress the voltage regulators inside. The radio gets very hot as it is, and it’s probably not a good idea to add to this.
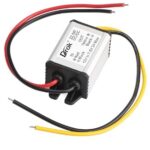
The power supply I’m using.
So to power the radio, I ordered this inexpensive buck converter, which drops the 12 volts to 7.5 volts. Edit: That one is now out of stock, but this one is equivalent. The power connector on the radio is a 5.5 x 2.1 mm coaxial connector, and I ordered this cable to hook to the converter. Rounding out the installation, I ordered this 12 volt cigarette lighter cord to connect to the input of the converter. Once I had this set up, I haven’t used the built-in batteries, although I guess that option is good to have. But some users might want to make the radio look a little more sleek by removing the battery holder.
Yes, the Receiver Picks up Noise from the Computer.
Other reviewers have noted that the receiver is subject to some noise from the computer (or quite likely, from the display). This does seem to be true. I haven’t done any extensive testing, but the receiver seems to be less sensitive than other receivers, probably for this reason. But for a QRP rig, the receiver seems to be more than adequate.
In fact, the display noise is a bit of a feature, rather than a bug. When I select something on the touch screen, I can hear it ever so slightly in the receiver audio. So you get an audible confirmation that you touched the button.
Yes, the Radio Gets Hot.
As noted above, the radio goes through a set of batteries quite fast, and part of the reason is that it’s generating a lot of heat. This seems particularly true when operating FT8, since it’s transmitting 100% power 50% of the time. But even on other modes, the radio gets warm. Some users have come up with various heat sinks, although I haven’t bothered. I have noticed that if you set the radio vertically, it doesn’t get as warm. If it’s laying flat, the back gets very warm, and having a little bit of airflow seems to make a big difference.
If you’ve ever had a long ragchew with a 2 meter handheld running 5 watts, you might notice that it also gets warm. While it’s noticeable with the zBitX, I don’t consider it troubling.
What You’ll Need to Get Started
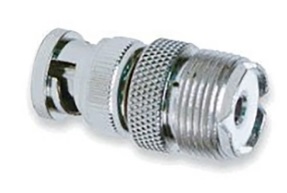
 I ordered the batteries while the radio was still on the way, and I was able to get the radio on the air as soon as it arrived. The antenna connection is a BNC connector, so if your antenna has a PL-259, you’ll need this adapter.
As long as you have batteries and a way to hook up an antenna, you can get on the air immediately on FT8, CW, or SSB. (Of course, unless you plan on using the CW keyboard, you’ll need a set of paddles.) However, to unlock other features, you’ll need to use, at least temporarily, an HDMI monitor, a keyboard, and a mouse. Surely, you can find those in your junkbox, but if not, the preceding links are to cheap but perfectly adequate versions at Amazon.
The radio has a mini-HDMI socket for the monitor, so if you already have an HDMI cable lying around, you will need this adapter. If you don’t have a cable, you can order this one.
To plug in the mouse and keyboard, the radio has a USB-C connector. The radio comes with an adapter from USB-C to USB. (Apparently, some recent purchasers didn’t get that adapter, so you might want to get one on Amazon.) But there’s only one socket on the radio, so you’ll need a USB splitter to hook them up at the same time. I suspect that you could get along without this, because I think you could use the mouse, click where you need to, and then plug in the keyboard.
Operating Without Display, Keyboard, and Mouse
As noted above, the external devices are not necessary to get on the air. If you’re like me, you can be on the air as soon as the radio arrives, as long as you have power and an antenna. You can use CW right away. A set of paddles is best, but you could do it with the on-screen keyboard and macros. FT8 requires no external hardware, and you can use SSB with the built-in microphone.
But there are a couple of setup tasks that are helpful and require connections to the external components. First of all, you will eventually need to set the time in the zBitX. This is done over the Internet. The radio comes pre-set from the factory, and when it arrived, the clock seemed to be close enough for FT-8 operation, which requires that the clock be within about one second. Interestingly, the hours and minutes were way off from the factory, but the seconds were accurate. But for the internal logbook to be accurate, you need the date, hours, and minutes. As soon as you connect to WiFi for the first time, it will automatically set the clock. I set it up with the home WiFi, but I also had it make the connection to my cell phone hotspot, so that I can use these features away from home.
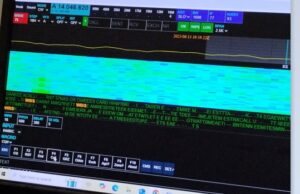
zBitX Web Display.
Setting up the WiFi is also important for another reason. If you tire of the small screen on the zBitX, it’s possible to connect to the radio via the web, and use your computer to operate it wirelessly. In order to do this, the device you are using must be connected to the same WiFi network as the zBitX. So connecting to WiFi is important if you want to use this feature in the future. Once you’ve connected to WiFi, this feature will be there an can be accessed whenever you want. But to do the initial setup, you’ll need the peripherals hooked up.
The zBitX is capable of operating other digital modes (such as PSK31). But this can only be done with a monitor, keyboard, and mouse connected. So if you eventually want to use one of those modes (I haven’t done so yet), you’ll need those peripherals. With the peripherals attached, the radio is pre-loaded with the WSJT software, so if you prefer that over the stripped-down version (especially if you want to use other WSJT modes), you have that option.
It should also be noted that once you have the radio hooked up to monitor, mouse, and keyboard, it is a full-fledged computer. For example, it has a built-in web browser, and it should be able to run anything else a Raspberry Pi can run.
Also, the zBitX has a built-in log. FT8 contacts get logged automatically, and you can also add CW or ‘phone contacts. I haven’t taken full advantage of this, but when hooked up to a monitor, keyboard, and mouse, it’s possible to download an ADIF file.
But 99% of the time, I use the radio by itself, and I used it for over a week before I was able to hook up the monitor.
The Screen is Really Small!
 One thing that will come in very handy when using this radio is a magnifying glass! When you are operating without an external monitor on FT8, the display is tiny, and you might not be able to make out call signs. Having a magnifier handy really helps. Also, the display gets overwhelmed by sunlight, so you do need some shade for operating outdoors.
Miscellaneous Glitches
As noted above, the rig does have a lot of software glitches. Once you get used to them, you can work around them and they can be almost endearing, but they are there. Essentially, sometimes, you tell the software to do something, and it doesn’t do it. Here are some of the the ones I’ve encountered.
The most annoying feature is that when you go from transmit to receive, it is not instantaneous. This seems to be the case on all modes. On CW, the break-in appears to be very fast, and you can hear the receiver as soon as you hit the last dit. But the receiver doesn’t regain its sensitivity for almost a full second. For much operating, this isn’t a big deal. But if you are contesting, the other station might have sent your full call sign in that short interval before the receiver comes to life. I don’t consider this to be a major flaw, because in most of my operating (such as POTA activating and chasing), it really doesn’t cause problems.
Another issue is the built-in keyer. Once the speed gets to a certain point, the onboard computer seems to be unable to keep up. So if you send an “H”, you’ll hold down the paddle for what you think is four dits, but the computer will generate three or five. I keep the keyer set to 15 WPM for this reason, even though normally, I would have it a bit faster. I think I could have it at 18 WPM, and it would work most of the time. But the keyer basically isn’t usable over about 20 WPM. So if you’re a speed demon, this rig might not be for you.
Update: When I originally wrote this, I hadn’t experienced any serious problems with the keyer. It’s slightly glitchy about about 18 WPM, but normally not bad. I had seen some reports that the keyer was unusable, and I dismissed these. However, a couple of times, the keyer on mine was so bad that it was totally unusable. It was impossible to get the right number of dits and dahs, and it didn’t even work correctly with a straight key (although the macros and keyboard seemed to work fine. I did find a workaround for this. If it’s totally unusable on CW, then switch to another mode (FT8) and transmit in that mode. Then, without switching back to CW, turn off the power and re-start it. Only after restarting, switch back to CW. This seems to fix the problem. It’s not enough to merely restart. Before restarting, you need to transmit in another mode.
As far as I can tell, the CW keyboard works fine, and doesn’t have any problem. (You do need to type in rhythm with the radio. If you get significantly ahead of the sending, it appears that some characters are lost.) The radio has a number of macros (such as CQ) pre-programmed, and you can use these from the screen. You can also enter text on the touchscreen, or use an external keyboard. Keyboard CW isn’t my style, so I haven’t tested this extensively. But it seems to work fine.
It does have a built-in code reader. According to the instructions, you need to set the code speed to match what’s being sent. When it’s set exactly right, the results are very good. But you will rarely have the speed set right. Because of the problems with the keyer, you can’t really set it much about 15 WPM and expect to send. So it rarely decodes correctly.
Use for Emergency Grid-Down Communication
 It’s possible that if you had machine-sent code on both ends, you might be able to use the code reader for keyboard-to-keyboard QSO’s. I haven’t tested this, but it seems like a possibility. One potential application for this radio would be for someone who wants reliable emergency or grid-down communications between two points with just a Technician license. I think it would be possible to use two of these on 80, 40, or 15 meters, and with good conditions, I think reliable keyboard-to-keyboard CW might be possible.
On the other hand, it would require quite a bit of practice to get it set up properly. In particular, I think there would need to be strong signals, and the code speed would need to be set identically on both units. You couldn’t just put one of these in the “go bag” and expect to be able to start using it after a disaster. At a minimum, both stations would need to coordinate in advance to make sure both radios are set to the same speed. I think it would work, but no guarantees. I have made keyboard QSO’s, but it does take some practice, since many of the functions don’t seem to be documented particularly well. And even though I’ve done some sending by keyboard, I’ve copied by ear. Just learning Morse Code is probably easier than messing around with trying to do it automatically, but it probably is possible.
When the received code matches the set speed, it does appear to decode pretty much perfectly. But if the speed is not set correctly, then the display shows gibberish. So again, advance practice is absolutely necessary. But for most casual hamming, the code reader isn’t particularly useful.
Another method of possible grid-down communication is with the use of FT8, which allows transmission of very short text messages under very marginal conditions. The FT8 protocol allows messages of up to 13 characters. If you just want to tell someone you are safe, or let them know a location where you want to meet, this can be more than adequate.
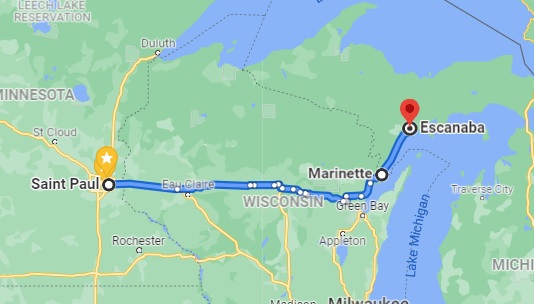
I haven’t experimented with whether it’s possible to enter such messages without hooking up an external monitor. However, it is quite simple to enter two elements of the message without any external hardware: The call sign, and the 4-digit grid square. I attempted some contacts on Field Day with FT8, and as can be shown from the map here, I was getting out, although not as well as I do at home. I didn’t manage any actual QSO’s on FT8, as after trying for a while, I went back to CW where it was much more productive.
But even off the shelf, you can send messages of up to about 8 characters (using a designator after your call and changing the grid square), certainly enough to let a pre-arranged contact know that you are OK.
It should be noted that use of FT8 (other than on 10 meters) requires at least a General Class license. But if you’re going to all the trouble of doing this, learning the material for an additional 35 test questions isn’t much to ask. (We should note that while it may or may not be true that you don’t need a license after “TSHTF,” you definitely do need a license before that day. And if you expect to use a radio like this to communicate even somewhat reliably, you will need to get a lot of practice, and that practice needs to happen long before anything hits any fan.)
It should also be noted that FCC rules prohibit the use of “messages encoded for the purpose of obscuring their meaning.” So you’re not allowed to send secret message in your transmissions. But there’s nothing inherently wrong about sending a short message, one word at a time. So a radio like this, with a simple antenna, could be a very reliable method of short messages without any additional hardware.
Software Glitches
The software occasionally simply fails to do what you want it to do. For example, if you shift modes to CW, the display might still be showing that it’s set up for SSB. When this happens, you can simply try again, and it seems to fix itself. For example, if I go from FT8 to CW, the display might be showing a display relevant for SSB. When this happens, I select another mode (for example, FT8 again), and then try again going to CW. Invariably, the problem corrects itself.
These little glitches don’t seem to be consistent, but there is one glitch that always seems to happen. When I get on the air, I often like to start on the highest band and work my way down. But when I power up the rig and go to 10 meters, there is zero power output when I transmit. If I go to another band and transmit, even for just a second, and then go back to 10 meters, it’s working fine. So what I’ve taken to doing is starting out on 15 meters, putting out a CQ or two, and then going back to 10 meters. After the radio is “primed” in this fashion, it seems to work fine on 10 meters.
The built-in FT8 software seems to work fine, but it has its own idiosyncrasies. As with the WSJT software you’re probably familiar with, there is a window show the band activity. So if you see someone calling CQ, you can click on their call, and it will automatically call them. But curiously, the display doesn’t seem to show all band activity. In fact, it doesn’t seem to show stations who are calling you. When someone does call, their call sign shows up in the logging window, and if they successfully send your report, that shows up in the logging window. And sometimes, the radio automatically sends “73” at the end of the QSO, and sometimes it doesn’t do this automatically.
Also, the list showing band activity can be difficult to navigate. When you want to scroll to the bottom, it frequently resets all the way to the top. So to see the most recent activity, you need to turn the little knob repeatedly until it scrolls down to the bottom.
As noted above, you can control the radio from another computer (or tablet or phone) using the web browser, as long as both are hooked to the same WiFi network. But, like some other features, this one is glitchy. Sometimes it works great, and sometimes it doesn’t work at all. Eventually, I’m sure I’ll figure out the problem, but like with everything on this rig, there is a learning curve.
Conclusion
Overall, I’m still amazed at what this radio will do for the money. Since it came, it’s the only radio I’ve used, and I’ve made hundreds of contacts with it. I don’t think I would recommend this as your only radio. As noted above, it has a lot of glitches. It’s not designed for the appliance operator, and there’s an understanding that some hacking of both hardware and software will be necessary. In fact, it comes with the Allen wrench necessary to open up the case.
Having said that, I am essentially an appliance operator, and I haven’t had to resort to that Allen wrench, nor have I had to go poking around the software. But I am a reasonably experienced ham, and at least I know when it’s being glitchy and I need to try again. For someone without experience, this radio might be an exercise in frustration.
As long as you are aware of the limitations, I think you will be amazed at what this little radio will do for the money.
Amazon links on this site are affiliate links, meaning that this site earns a small commission if you make a purchase after using the link.
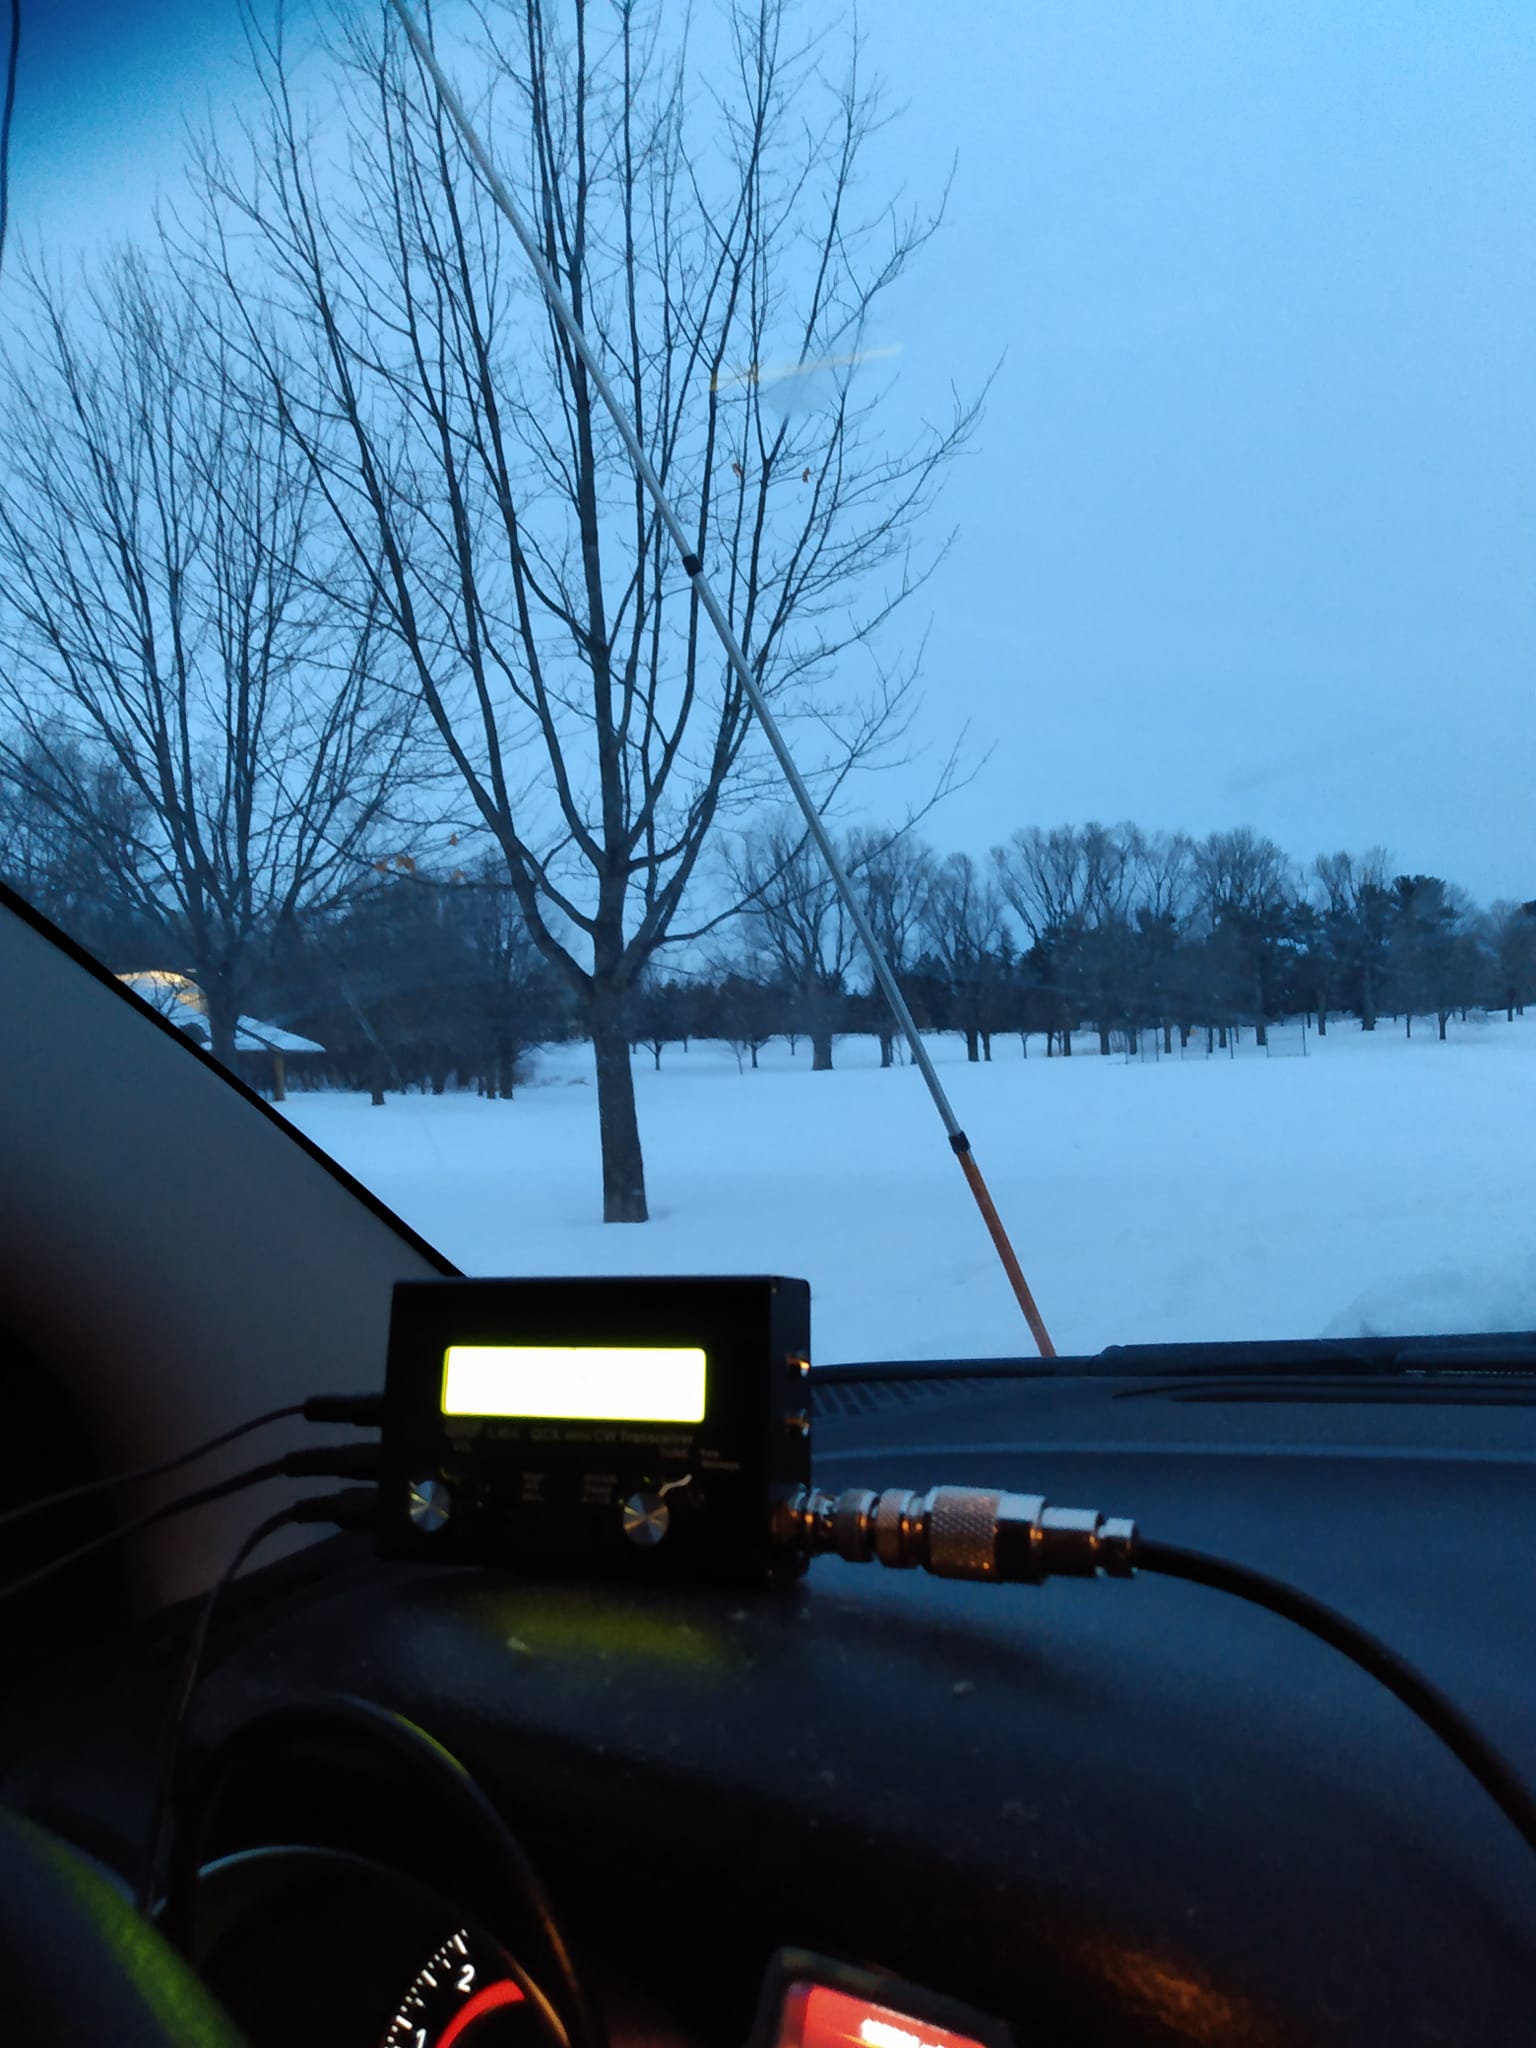
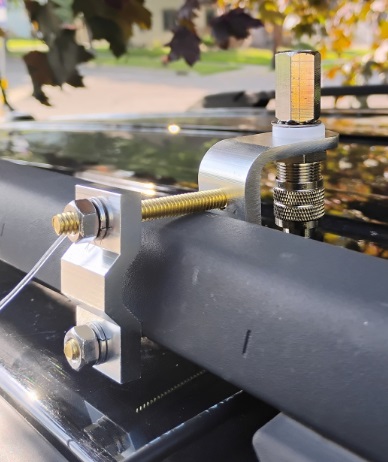 Now that I have my little zBitX transceiver, I’ve been trying it out during POTA activations. For Field Day, I set up a temporary dipole, but it’s always nice to be able to operate right from the car. In the past, I’ve used a trunk mount and a magnetic mount antenna. The trunk mount doesn’t fit very well on my car (a 2014 Dodge Journey), and the magnetic mount is old and in pretty bad shape.
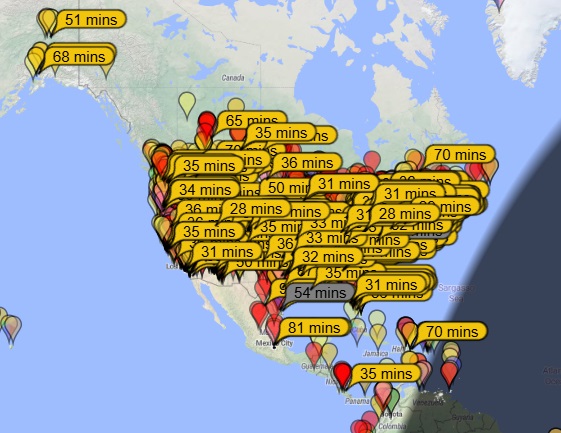


 about his experiences living in Kyiv, Ukraine, in the middle of a war. Wlad, like me, is an attorney, and lived a middle-class existence similar to mine, until Russia invaded eastern Ukraine in 2014. He and his family then relocated to Kyiv, but with Russia’s 2022 invasion, he was once again in the middle of the war. His wife and teen son and daughter evacuated to Poland, where they were able to find an apartment, thanks in part to the generosity of friends in America and elsewhere.